Friday, December 30, 2011
Diagramming Tatting Patterns
I found a patch that fixed the issue I had with Inkscape 48.2. I created the wreath diagram again using a polar grid as a guide for ring placement. I think the pattern looks much better. Perhaps I'll get some tatting done tomorrow (hmm, or is it today already?) My day was filled with researching the software issue and cleaning up my kitchen. Plumbing issues left me without a dishwasher or kitchen sink for three days. It feels wonderful to have a clean kitchen again.
Thursday, December 29, 2011
My progress with EazyDraw has been very slow. Gina S. discovered that Inkscape is now available for the Mac so I downloaded it. In less than an hour I had a ring only wreath pattern diagrammed. It isn't perfect, but at least it is done and I learned a few things doing it. I couldn't get Inkscape to give me a polar grid which would have helped. It requires a software fix with which I need help or advice. I've contacted my favorite computer forum for advice and await the results. I think it would also work better to place a circle behind each round of rings to simulate the connecting picots. I want to fix the software glitch before I try anything else, though.
Sunday, December 25, 2011
I'm spending this special holiday with people who brighten my life. I'll take along some tatting, but I'm unlikely to get any done. I will do lots of singing, eating, and laughing though.
Still no pictures for the blog, but I've done a little tatting. I spent my first few days off getting some shopping done. I've pulled out my tatting only one afternoon, but the result is a new use for one of my old designs. The only hint you get at the moment is that it contains some lovely red beads. My plans for this next week include lots of tatting and designing time as well as more time working with EazyDraw.
I hope each of you finds some time this week to enjoy those activities and people who brighten your lives.
Sunday, December 18, 2011
The past few weeks have been busy and I've moved from a temporary hire to an official part of the staff at work. The end of a school semester also offered me opportunities to do a bit of tutoring: statistics and the use of SPSS (statistical analysis software) and writing in the American Psychological Association format. I've managed to squeeze in some Christmas shopping, too. Do I sound like I'm making excuses for the lack of tatting in this blog? I am. (GRIN)
I've been learning more about my drawing program, thanks to Susan Fuller's online class. I've also got a few new designs in my head that need to get out. My plans for the holidays include many hours for both of these projects.
I've been learning more about my drawing program, thanks to Susan Fuller's online class. I've also got a few new designs in my head that need to get out. My plans for the holidays include many hours for both of these projects.
Sunday, December 11, 2011
Latest tatting inspiration
Are you familiar with some of the tatting that is being done with Trapilho yarn? Anne Bruvold posted a link within one of the forums at Intatters that took me to the website of Liv Øyen Strind http://nupereller.no/ where I saw some huge pieces of tatting composed of a small number of very simple motifs. I suddenly envisioned tatted doormats, table runners, bathroom rugs, etc. throughout my house. Anne then shared a link to a YouTube video of herself tatting with this yarn. Now I really must find some Trapilho yarn.
Monday, November 28, 2011
Exploring my drawing program
I'm really impressed with EazyDraw. My efforts to create patterns with it so far have barely scratched the surface of its capabilities. In fact, I've done things the hard way more than once. The tips from the online design class got me so excited about the possibilities that I printed the user manual and started reading. It is easy to read and written for the layman. When it told me what options I had for exporting a drawing, it explained how the formats differ. Perhaps I should type a disclaimer here that I have no affiliation with the company! I know I sound like a commercial. I'll go read my user manual now. I'll see some of you in class tomorrow evening.
Thursday, November 24, 2011
Have you missed me?
I have certainly missed all of you. I've been busy settling into the job I accepted in September and loving every minute of it. Of course, that has meant less time for tatting and keeping up with all of you. Most of my sales have been outside Etsy. I've listed the items I've restocked. Since I have less time available now, I'm listing after I tat them up.
The new tatting design online class is wonderful! It was just what I needed to help me make some progress with EazyDraw and it has sparked my creativity as well. This past Tuesday evening was my first time to get to join the fun, but I read the logs from the first two sessions and started the homework. My latest update of EazyDraw came with a few tutorials which are also proving helpful.
Reading your tatting blogs is also an inspiration to me. I'm sorry there are no pictures in my blog today other than the Etsy listings. It is almost time for the big family get-together!
Sunday, September 25, 2011
Tatting for myself
I entered the weekend with no orders to fill so I decided to tat for myself. I began with one of the "Wanda" bracelets in black with gray, marbled beads. Then I needed a pair of earrings to match so I needed a new design! I then worked up some earrings by another design I created a few weeks ago that combines some ideas from "Starry Night" and "River Dancers." There is yet another new pair of earring jackets, too, but you probably won't see them until after Christmas. Here is a picture of my new bracelet and earrings.


Monday, September 19, 2011
Kidney wire pumpkin earrings for Halloween

I've been busy creating my own pumpkin patch! One of my customers ordered 13 pairs of pumpkin earrings. She picked them up this morning and delivered them to her coworkers today. I found some 3/4" kidney wires in sterling silver and some in nickel free gold colored plating so she was able to take a variety to meet individual needs. I hear they were a big hit. She sent me some sweet text messages from some of the recipients. While I tat for my own pleasure, it brings me a great deal of joy to have it wind up in the hands of people who appreciate it.
The deadline for ordering these is October 15 as I want to be sure that everyone has their earrings before Halloween.
Have a great week, everyone!
Friday, September 9, 2011
More bracelets
I've been busy producing more "Sarah's Sparkling Glamour" earring jackets and "Wanda" bracelets to fill orders. I am having such a great time with these bracelets, playing with a variety of colors of thread and beads. The bracelet pictures have been posted with the listing on Etsy, but I'll put them here as well. I hope you enjoy them. I got to choose from my collection of buttons for the two in the lower picture.

 I started a new job last week, too. I'm helping college students prepare for the job market and recruiting non-profit organizations to partner with the university to provide internships for our students--a great benefit to both the organization and the students. I love what I'm doing. I feel so blessed. I have a people intense job that is very rewarding and a work-by-yourself business that seems to revitalize me in ways it is hard to explain to someone who does not have that desire to create.
I may not get to post more than once or twice a week, but know that I'm thinking of all of you and eager to come back and see what you have been doing.


I may not get to post more than once or twice a week, but know that I'm thinking of all of you and eager to come back and see what you have been doing.
Wednesday, August 31, 2011
Inverted Tatting Practice

Tuesday, August 30, 2011
Custom Tatting
I'm working on a few orders this week - all bracelets at the moment. The first of these are some Sport Your Colors Bracelets for a small wrist. All of her favorite colors will be paired with black which is the staple in her wardrobe. Nice idea! Red and black is finished. Now to get the others done.


Sunday, August 28, 2011
Another bracelet - Wanda
I finished the design, the test-tatting and got my first one ready for delivery. The customer loves it--says it is just what she had in mind, which is always great to hear. I already have orders for two more which is also nice. The thread in the one pictured here is Lizbeth Harvest Orange Medium and the beads are in shades of brown.


Friday, August 26, 2011
Sorry, no pictures today.
I spent a few hours yesterday trying to put things in order in my new work area and spent the rest of the day working on drawings for a new bracelet. My customer selected the thread and the beads and gave me a general idea of what she wants. I finally settled on something this morning. I'm about to begin the tatting and, if it works up as I hope, I'll send off some pictures to get the design approved. Maybe I'll have a bracelet to show you tomorrow.
Tuesday, August 23, 2011
All healed & River Dancers bracelet in Purple
It was hard to keep my hands off my threads for a week, but I knew my fingers would heal faster if I did so. So I played foreman to my family crew as they moved furniture around to get my workroom set up for me. I managed to get a work area established so I can get right to work on the four orders I've received for the multi-colored earring jackets. It will take me weeks to get everything organized like I want it in the two rooms I wrecked in order to make my space, but I'm already loving it.
Here is the purple River Dancers bracelet I finished just before I hurt my hand. The color of the coordinating earring in the picture is closer to the color of the purple (Flora 215). The flash makes the bracelet look a bit too red. Flora calls the color Dark Purple.

Here is the purple River Dancers bracelet I finished just before I hurt my hand. The color of the coordinating earring in the picture is closer to the color of the purple (Flora 215). The flash makes the bracelet look a bit too red. Flora calls the color Dark Purple.

Thursday, August 18, 2011
Injured Fingers
I have another bracelet finished with the River Dancers pattern, but no pictures yet. I'm taking a break from tatting for a few days to let my fingers heal. There is a routine to how I bring the dog in from the dog pen at night. He just unexpectedly veered from the routine when my back was turned. He lunged after something (I never saw what) and I didn't get my fingers out of the leash quick enough to prevent a bad rope burn across 4 fingertips. It was every bit as painful as the microwave steam burn I received a few years ago. I paced the floor with my fingers in a bowl of cold water waiting for the pain relievers to kick in. I am amazed, though, at how quickly it is healing. I may be able to tat tomorrow or Saturday.
Meanwhile, I've been working on plans for some major rearrangement of furniture. My sewing and tatting supplies have been gradually spreading out over two rooms this summer as my work area is central to the two-room area. All other users have agreed to let me have the smaller of the two rooms as my own. So I've been measuring the spaces and pieces and sorting things for storage, trash, give-away, etc. DH is off Monday so I hope to get it all set up like I want it then.
Meanwhile, I've been working on plans for some major rearrangement of furniture. My sewing and tatting supplies have been gradually spreading out over two rooms this summer as my work area is central to the two-room area. All other users have agreed to let me have the smaller of the two rooms as my own. So I've been measuring the spaces and pieces and sorting things for storage, trash, give-away, etc. DH is off Monday so I hope to get it all set up like I want it then.
Saturday, August 13, 2011
Amazing Discovery!
Okay, well it is amazing to me and I stumbled upon it by accident. If you've read the listings at my Etsy shop, you know that when my cuff bracelets get a little stretched, I pour hot water over them to tighten them up again, then lay them out to dry. Well, being a bit impatient with the drying process and determined to wear my bracelet, I put it on while still damp. It was like having an air conditioner on my wrist! Why didn't I discover this earlier in the summer?! However, since the heat wave continues, I plan to wear matching cuff bracelets spritzed with water, maybe even scented water, for the duration of this weather. Here is the latest one I listed at Etsy today. Oh, and I got the beaded one listed, too, calling it River Dancers. Thanks for your help in naming it.


Friday, August 12, 2011
Sporting your colors in tatting
School begins again here in Arkansas in the next few weeks, and arms and ankles need some tatting. My latest tatted bracelets are made with DMC cotton embroidery floss using finger tatting and 2 shuttles. I chose to try a design in embroidery thread because of the wonderful selection of colors available in DMCs colorfast floss.


Wednesday, August 10, 2011
More Bracelet Designs
Well, I got the next snowflake in the Crystal Collection listed in the shop. If you've tatted my Celtic Snowflakes, you will recognize this pattern. (The next in the series will be a new one.) I need to finish the counterpart for the Peppermint Collection and get it listed as well, but I've been distracted by more bracelet ideas.

Here are my latest bracelets. Several months ago, I made a bracelet using Carolyn Groves Two-fer Bookmark. It just didn't work as well as a bracelet as it did as a bookmark, but my youngest daughter still liked the basic idea of it. We've been playing around with some variations and settled on these two. Finding it difficult to decide which I like best and having my daughters each choose a different favorite, I'll probably use them both. The one with the button is mine. The one with the toggle will go in the shop. I've got a request for another like the one with the toggle, but for a smaller wrist and with a lobster clasp. I personally prefer the button clasp and I had this beautiful button (see the closeup).

The beaded braid bracelet never made it into the shop. It is off to a new home, still without a name. I need to get another done. Many thanks for the name suggestions. You've given me some nice ones to consider, but I haven't made a decision yet. I guess I have at least until I get another tatted to list.
Sunday, August 7, 2011
Bracelet needs a name

Saturday, August 6, 2011
What a week!
While I had big plans to show you my latest efforts in tatting last weekend, everything seemed to go wrong. Then I got one of those migraine headaches that lasts for days. Thankfully, they are very rare. While I managed to cope with life pretty much as usual in spite of it, I wasn't up to anything requiring intense concentration like tatting or image manipulation. Then I spent two days at the hospital with my dad, who is home and doing great now. So I hope the reveal is better late than never.
I mentioned some time back that I'm revamping many of my designs. My latests listings at Etsy begin with some changes to the Celtic Snowflake patterns that I shared through the Online Classes several years ago. I've been working with size 80 thread, tweaking the designs, adding beads, and expanding the number of designs. Each design will be offered in two collections. The Crystal Collection is white with iridescent clear glass beads to provide sparkle. The Peppermint Collection contrasts white thread with sparkling red glass beads.


My goal with all of the patterns in these collections is to produce designs that are stable enough to hang without stiffening. This will make them lower maintenance for their owners and will reduce the chemicals in the lace.
If you want a preview of a couple of the other flakes that will be listed in the collection, check out the photos I listed at Etsy.
I mentioned some time back that I'm revamping many of my designs. My latests listings at Etsy begin with some changes to the Celtic Snowflake patterns that I shared through the Online Classes several years ago. I've been working with size 80 thread, tweaking the designs, adding beads, and expanding the number of designs. Each design will be offered in two collections. The Crystal Collection is white with iridescent clear glass beads to provide sparkle. The Peppermint Collection contrasts white thread with sparkling red glass beads.


If you want a preview of a couple of the other flakes that will be listed in the collection, check out the photos I listed at Etsy.
Friday, July 29, 2011
Something in the works

As to the project in the works, I hope to introduce it this weekend. Four designs are done, but there will be more over time. However, I've got a tremendously long and busy day today that has nothing to do with tatting, so we'll all have to wait until the weekend. I've bespoken my daughter's good camera to take photos. I want something better than my iPhone can produce and with more staging than I can arrange with the scanner. Curious? I hope so. ;)
Wednesday, July 27, 2011
Colorful Glimmer

Tuesday, July 26, 2011
Filling Custom Orders

Thursday, July 21, 2011
Halloween Tatting for Scrapbook and Card Making

Wednesday, July 20, 2011
Halloween in July

Tuesday, July 19, 2011
Trio of Hearts Earring Jackets
I'm one of those people who doesn't look her best in long, dangling earrings, but I like to wear my tatting. Back in the 1990s I made earring jackets for myself and my friends--little pieces of tatted lace that you can wear with your favorite post earrings. You just place the post through the designated part of the lace and then put them into place. The lace is so thin that it doesn't affect the fit of your earrings. This is a recent design and very simple if you can make dimpled rings. I think it looks best with small earrings so more of the heart shapes can be seen. My mother, my oldest daughter, and my great niece love them. They've requested several pairs in their favorite colors.


Saturday, July 16, 2011
Tatted Bookmark with tiny pince-nez

Monday, July 11, 2011
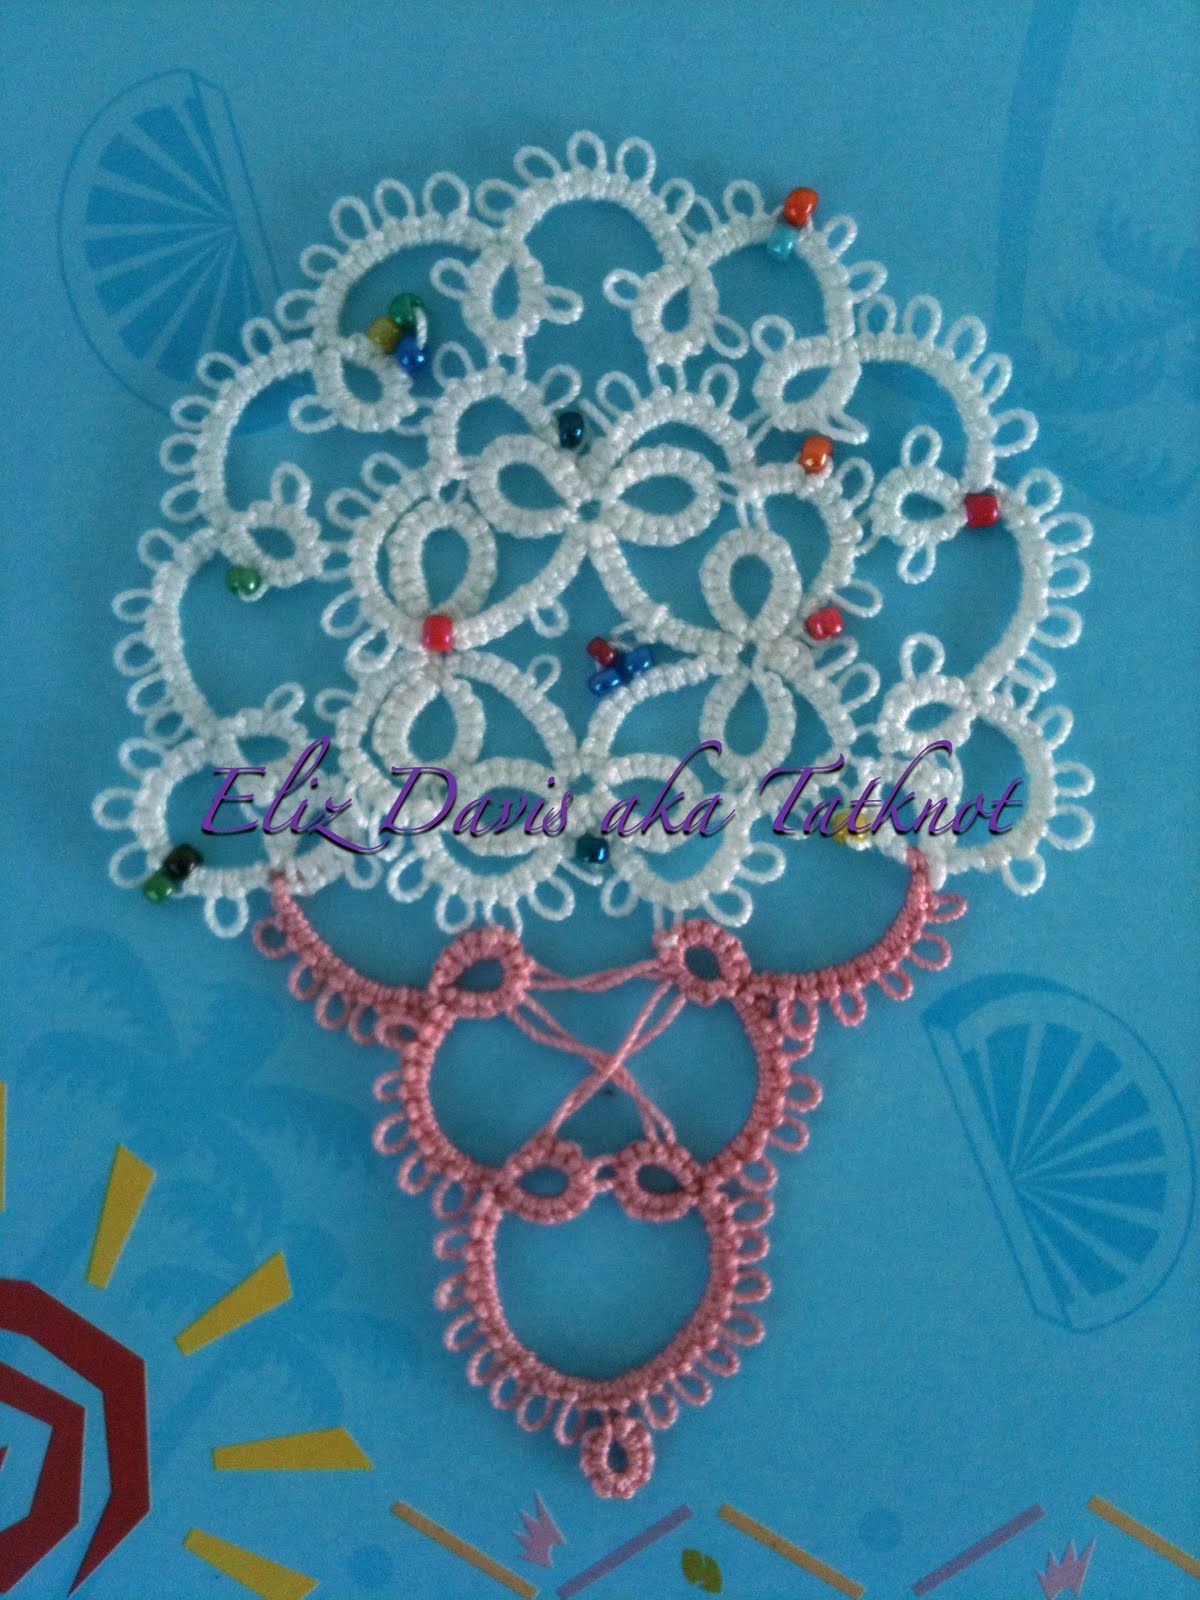
Ice Cream Cone Revamped
Saturday, July 9, 2011
Test Tat of Heart's Honor
Here is my test tatting of Wanda Salman's Heart's Honor Bookmark. Her pattern was extremely well-done. I really like the design and enjoyed tatting it up. Thank you, Wanda, for allowing me to test tat for you.


Friday, July 8, 2011
Baby Booties Premiere
While I managed to get these listed at the Etsy shop a couple of days ago, I forgot to share them with you. Many hours have been invested in designing this pair of baby booties over the past couple of weeks. I wanted something very dainty so I worked with size 80 thread and this is the results.


Wednesday, July 6, 2011
Tatknot joins Etsy
I'm really behind in reading your blogs and I've neglected the hanky edging for a couple of weeks now. That is because I've been busy working on my plans to join the Etsy community as a shop owner. My family and friends have urged me to do it for a long time and I finally had the time to get moving on the project. I've created some new designs and revamped some old ones. I'm very excited about the project. For now, I'm listing only tatted pieces, but I've designed some other types of projects over the years that will eventually make their way into my shop.
Setting up an Etsy shop is much more involved than I expected. There are many decisions to make, and that was bogging me down. However, I think I've figured out the basics and my listings will be going up throughout the day.


Saturday, June 25, 2011
What do you think?

Meanwhile, I need some opinions. This image is of a couple of the Flaming Caverns Bookmarks. I tried switching the roles of the solid and variegated threads to see what happens. It might be easier for you to make up you mind about which look you prefer if I had used the same colors for both samples, but I didn't. Sorry. I have two daughters and each has a different preference. Do you have a preference from these two samples?
The hanky edging has been my project during family television watching, but everyone has been too busy at other things this week. While that is a good thing for the family, it means the edging has been neglected. I should manage some progress on it this weekend, though.
Friday, June 17, 2011
Beaded Celtic Snowflake
I decided to pull out some of my own patterns for play. This is my Celtic Snowflake I in a size 60 thread with glass beads added. From bead to bead it measures 6 cm.

The hanky edging is progressing slowly as I needed to slip into production mode with some of my tatting projects. I'm still managing to practice with a few techniques as I work. The up join provides a smooth look to a ring, but is extremely awkward for me, especially with tiny picots. If any of you have any tips for the up join, please share. I have lots more work to do with the different joins before I make up my mind about how they will affect my own work.
The most exciting 'technique' I've discovered lately is from the March 9 post of Jon Yusoff entitled "How to estimate the amount of thread required for a project." While I know there are lots of great ideas out there for how to empty your shuttles with tiny projects, I much prefer the idea of loading what I need and only what I need. To test the technique, I started with some of my favorite thread sizes and a few of my favorite designs. With my first project (one of the Flaming Caverns bookmarks), I cut it so close that I had to take the shuttle off to finish the last ring. Since then I've thrown in a few extra centimeters of thread just to play it safe. I've used it nine times now, each a success. It takes a little time to do the math before you start, but I think it well worth the effort. Jon, I thank you.
Saturday, June 11, 2011
Another Round Robin Doily From the Past

The specific guidelines for a round robin group can vary greatly, but the basic guidelines are usually pretty similar. You usually try to match people of similar skill levels. There is room for lots of flexibility.
The doily is usually begun by the member who will own it at the end of its travels. You send your center, the instructions for what you've done so far, and the thread, beads, etc., to be used in the project. As the piece moves from member to member, each adds another round or two (determined entirely by the tatter to get the look they envision) and encloses the instructions for the parts they have added. When it returns to the person who created the center, they have a completed doily and the instructions to reproduce it, as well as any leftover supplies.
Round robins don't have to be made with original designs. In some of my earliest efforts, we were encouraged to tat a motif we liked for our center. Edging patterns or other doily patterns were sometimes used for succeeding rounds. You do need to add picots that others might use in successive rounds. The first few people might choose to add something different every time, but the last few are going to have to think about how to bring it all together to look finished, especially the last tatter. That is one reason a tatter may add more than one round. Their part may not look finished without them. Sending the instructions around with the piece provides members with the information they need to repeat elements from an earlier round in their own round helping to pull the design together.
It is also a long commitment. There is usually a limit on the amount of time you have for each doily, but it must be long enough to give you time to think out your part as well as produce it. I think we usually had a month, so you can see that, depending upon the size of the group, you could have project commitments for many months. There is also the expense of postage as you send each piece on its way.
In terms of designing, it is very similar to me to the agonies I go through in deciding what edging to put on a hanky. It is a matter of deciding what will look right with what is already done.
My one regret about my own round robin experience is that I didn't get the patterns for all of the doilies I helped to create. I think the difficulty of putting the final pattern together is one of the reasons for that. If I did one today, I would want every group member to scan or photograph the pieces as they progress and mail or email the instructions and image to the other members each step of the way. Then all members would have all of the patterns without any extra work at the end.
Is it challenging? Yes! Is it fun? I think so. Would I do it again? Definitely!
Friday, June 10, 2011
Round Robin Doilies From the Past
I didn't expect to get to tat today, but I managed to get about 3 inches of the hanky edging done during a break this afternoon. This evening I've been sorting through some of the tatting documents I've accumulated over the years. I came across some scans and pictures of doilies from round robins I participated in during 1997. I thought you might enjoy seeing them. I didn't get to see the other two completed doilies.
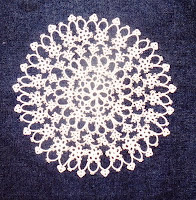

This doily was started by Judy Gorrindo and was returned to her after I added its final round.
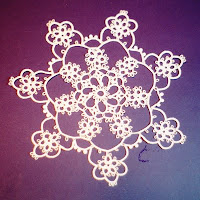
 Every round robin doily is unique and it is so much fun to see them come together. This is probably my favorite doily of all the round robin doilies in which I've had a part and it belongs to Sue Hanson who designed its center motif. The round robin began in 1999 and I added a couple of rounds early in its movement (the small rings with two chains). When one of our team members had to drop out, I volunteered to finish the piece, adding the last two rounds. I just love looking at this one.
I wonder what other treasures I'll find as I clean?


Both of these first two were both made from my center motif. The second picture is the one that was produced by the entire team. I call the first one our Oops Doily. When my doily became temporarily misplaced, one of my team mates tried to get it going again, but she didn't have the instructions from the previous rounds. As a result, I got two doilies from the round robin. I put the final rounds on our Oops Doily. (As you can see, the original piece turned up again and finished its rounds.)


I wonder what other treasures I'll find as I clean?
Thursday, June 9, 2011
Distracted from tatting
I'm doing a lot of deep cleaning at home so I'm not getting any tatting done. My youngest daughter and I are working together which makes the work more fun. I'll be back with my tatting progress in a few days.
Tuesday, June 7, 2011
Link to old Harpers Bazaar Issues
I googled Harper's Bazaar, November 1870, looking for an edging pattern that was mentioned in an email I saved from an old Arachne discussion. I found links to lots of issues here. Have fun!
Monday, June 6, 2011
Hanky Project Day 5
I've rounded the first corner and now have a good idea of the number of clovers needed for the remaining sides. My husband had to loan me the 3.0 reading glasses he uses for detail work on plastic models when I had to untat a ring that wouldn't slide. I think I'm going to add a pair of at least 2.5 reading glasses to my tatting bag. They are much more convenient to use than a magnifying glass and won't take up a lot of space in the bag.

Saturday, June 4, 2011
Notes on the Magic Thread Trick
As I was responding to some of the comments from my last post, I had an "ah ha!" moment about the magic thread trick. This is a trick I haven't used very often. It requires planning ahead so that you get loops in place before you need them and I've usually been too lazy to bother, since sewing ends into the piece worked pretty well for me. I find that more difficult to do these days so I'm once again motivated to use the Magic Thread Trick. One of the mistakes I sometimes make is that I put a loop in headed the wrong way. Frustrating! I've always pulled it out and grabbed my needle, but I just realized I don't have to do that. I can pull another loop through with the first which will now be headed in the right direction!
For those of you who don't want to bother with the Magic Thread Trick, Fox tells me that she and Jane Eborall use calyx needles (which have slotted eyes) for sewing the ends back into their tatting. I just love having choices! I plan to get a few for my tatting bag for those times when I forget to add a Magic Thread loop. It will happen. :)
P.S. I got several inches done on the hanky edging last night. I'll post a picture later today.
Friday, June 3, 2011
Technique Practice
I haven't picked up the doily yet today, but I did some technique practice. After practicing a little more on the motif I was messing around with yesterday, I started my tatting time today by trying Mary Maynard's candy cane again (see the previous post for the link). I'm really pleased with my split chains. I also successfully tatted over ends and enclosed the final ends with the Magic Thread technique. I often forget to include my loops or get them in backwards, but I took the time to carefully think out where they needed to be.
The other motif started out as Lene Bjorn's Thirteenth Day of December from 24 Snowflakes in Tatting. While grumbling to myself about the thread I had chosen to use, I missed a small chain segment in the second round of chains. I didn't realize my mistake until I had come around with the third round of chains. I decided to quit with that round and hang it from the messed up chain side as an ornament. It is a wonderful pattern which I will use again with a thread I enjoy. It served well to give me some split chain practice though. There is a short 4 ds split chain in every round. The Magic Thread technique took care of the ends again.
 Now I'm going to go work on the hanky edging for a while.
The other motif started out as Lene Bjorn's Thirteenth Day of December from 24 Snowflakes in Tatting. While grumbling to myself about the thread I had chosen to use, I missed a small chain segment in the second round of chains. I didn't realize my mistake until I had come around with the third round of chains. I decided to quit with that round and hang it from the messed up chain side as an ornament. It is a wonderful pattern which I will use again with a thread I enjoy. It served well to give me some split chain practice though. There is a short 4 ds split chain in every round. The Magic Thread technique took care of the ends again.

Thursday, June 2, 2011
Hanky Project - Day 1 & Split Chain Progress
Attached is a picture of what I've done with the hanky edging so far. The thread is Mettler Machine Quilting Thread which is smaller than size 80 tatting cotton. I think it may be about a size 100. The edging is inspired (based on) Mary Konior's Beaded Braid. I started at what I felt was the most difficult part, the scalloped corner. Keep in mind that there will be one more round.
 I've spent most of my tatting time today trying to master the split chain. I made it successfully multiple times years ago from typed out instructions provided by David from Australia to the Arachne email list. Of course, I couldn't find David's instructions anywhere when I wanted them today. I'm glad that there are so many resources on the internet to help with learning a technique because, even armed with 4 sets of instructions, I just wasn't getting it. It was this link, http://www.tribbler.com/tatman/, that finally began to get a dim glow of recognition. I had originally learned, though, to tat the split chain from right to left rather than left to right so I went back to Jane Eborall's original method instructions. I'm finally making something that looks like double stitches! I've got a lot of practice to do before this is comfortable which is my goal, but at least I've found the method that works best for me.
I hope those of you who are struggling with learning a technique will take heart from my story. Just because you can't seem to get it with one set of instructions, don't give up. Find another resource. There is more than one way to do many things in our craft and even more ways to explain them. Maybe I'll have a split chain project worth displaying tomorrow. Meanwhile, here are my practice pieces.

The split chain stitches in the candy canes look like double stitches from one side, but look awful on the other side. The unfinished split chain in the solid motif show the first good stitches I feel I've made. I'm going to try the Mary Maynard's candy cane again now that it is beginning to make sense.
Edit: I should have checked my mail before I posted. Georgia Seitz sent me a link to a split chain video by Linda Davies that is just what I needed. This looks the closest to the method I remember using before. Now to practice, practice, practice. Many thanks to Linda Davies for making and sharing the video, and to Georgia for sending it to me!
Wednesday, June 1, 2011
Hanky Edging Trial & Learning New Techniques
I made my list of techniques I'd like to learn or practice. Wow! There were many more items on the list that I expected. I've tried a number of them at one time or another, but didn't master them well enough to use them regularly. I'll start by experimenting with different types of joins and mastering the split chain. Those seem to offer the most benefit to me at the moment. Later I'll pick a few more.
Feeling a strong desire to get the edging started on the hanky Diane gave me, I opted to begin with someone else's design rather than create one of my own. (I think I have enough design projects underway already.) I chose Mary Konior's Beaded Braid (page 9 of Tatting with Visual Patterns). Ignore the single ring. Mary's pattern has the clover with the bead at its base repeating over and over again with a final round of chain to finish it off. With my little practice piece of edging, I can already see a need to lengthen the chains between the clovers. I have some ideas for the corners and rounding the largest part of the scalloped corner.
Feeling a strong desire to get the edging started on the hanky Diane gave me, I opted to begin with someone else's design rather than create one of my own. (I think I have enough design projects underway already.) I chose Mary Konior's Beaded Braid (page 9 of Tatting with Visual Patterns). Ignore the single ring. Mary's pattern has the clover with the bead at its base repeating over and over again with a final round of chain to finish it off. With my little practice piece of edging, I can already see a need to lengthen the chains between the clovers. I have some ideas for the corners and rounding the largest part of the scalloped corner.

After adding the round of chain scallops on the outside, I think the tatting will be the same width, or slightly larger, than the "ribbon" of the corner. And even though they don't look it in this picture, the beads are white. What do you think?
Tuesday, May 31, 2011
Another cross & my tatting plans for the day

What little tatting time I had yesterday was inside a moving vehicle, so I picked up Lene Bjorn's 24 Snowflakes in Tatting and some white thread and started out the door. I spent more time trying to decide what to tat first than I spent tatting! The book is full of beautiful projects. I selected The Thirteenth Day of December and got started.
If you have this book, you are immediately going to realize how little tatting I accomplished when I tell you that I made it as far as the spot on round 1 where Lene suggests a false chain. I love learning new techniques, but one problem I run into is that I don't use them enough to make them my own so that I need to dig out the instructions every time I need them. Of course, I didn't take split chain instructions with me. I hadn't planned that far ahead.
The exciting news is that last night's Online Tatting Class lesson was the split chain and Mary Maynard shared a Candy Cane pattern for practice. I didn't make the class session, but I'm headed to the website today to print the instructions and review the log. So doily designs and The Thirteenth Day of December are temporarily UFOs while I master the split chain. I needed to set the doilies aside for a few days anyway so I can return to them fresh.
I've been thinking about making a list of techniques I would like to master and then setting myself a personal challenge to work with each technique until I feel really comfortable with it. I need to think it through and make the list first so I can see how many techniques I'm talking about. Maybe some of the rest of you would like to make a similar list and we can share some project ideas for practice. I expect Georgia's Online Class website will be my main resource.
Time to get back to work around here. Then I'm going to make that list!
Sunday, May 29, 2011
Roger aka Freedman crosses
My oldest daughter wanted to do some tatting this weekend. After looking through my collection of patterns, she chose one of Roger aka Freedman's patterns designed in 2000. It looked like fun so I loaded a shuttle, too. I love the fact that one full shuttle and a ball were perfect to complete each cross. I finished one and started another while we watched a movie together last night. Then I finished the second one this afternoon. Both of these are made with size 20 Manuela threads. The red one is like the original pattern. The other has the longer base recommended in the pattern.
Roger shared this pattern years ago on his NeedleTattingTwo website.

Roger shared this pattern years ago on his NeedleTattingTwo website.

Friday, May 27, 2011
Jane Eborall's latest cross patterns
Here they are. It has been fun to take a break from the doily designs to try the three cross patterns that Jane Eborall has released in the last few days. All three threads are by Manuela. The Flowery Cross is done in a size 10 variegated. The Celtic Cross and the Iona Cross are both in size 20. I tatted them in the reverse order to the way Jane released them. I started with Flowery Cross. If you look closely, you'll see that my rings are not very smooth looking. I found that I tended to tat my rings too tightly. I relaxed the tatting in the next two and I think they look much better. I also made the lock join chains longer. This is the first time I've made lock join chains and I really like the way they look as well as how easy they are to tat. Thank you very much, Jane, for sharing these patterns. They were lots of fun to tat.
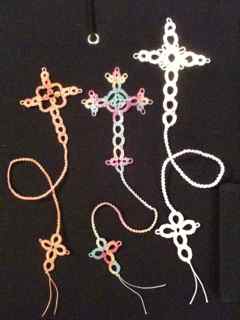 The patterns are on Jane's website here or you can read about them and then follow the links in Jane's blog.

Thank you, Diane.
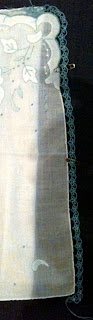
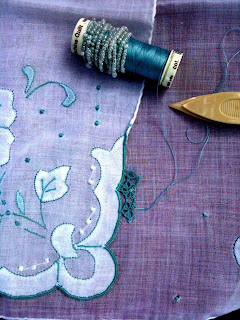
Here is the lovely doily that Diane gave me in her recent Great Hanky Challenge. I found a thread in my stash, Mettler Color #669, that seems a perfect match for the embroidery. I need to decide how I want to attach an edging before I actually start work, but I'd really like to try to design an edging.


Bill Cosby Breakfast

Thursday, May 26, 2011
Doily Ramblings
I love designing. Most of my projects have been small ones. The only doily designs I've done were parts of round robins, and those were years ago. I don't think I've ever designed one from beginning to end all by myself that was bigger than a coaster or snowflake.

I mentioned that I'm playing around with the Valeire Square again. It is no surprise to me that my first motif should turn out to look complete at coaster size. But I found myself wondering what if I did this instead of that and then added this in the next round and it's growing! The problem is that just as I've got the idea I like to finish it off at its new size, I've also got ideas about where it could go next. It occurs to me that I need more centers so I can finish the current one as I envision it and then do it again with the other ideas.
At some point I'm going to change colors again so I won't get bored with this project, but I find myself wondering how doily designers know when to quit. With round robins, the number of tatters involved determines when it is finished. So please tell me, how do YOU decide when a doily is finished?
Notes about the picture. The one with the dark outer rounds is the first motif and it is complete as is at 10 cm in size 20 thread. The other is still in progress. I haven't finished the tatting or eliminated the thread ends yet. The pic is just to give you an idea of how I'm playing with the design.

I like to design in color, but I will want to test them in a solid color before I consider any of them truly finished.
Sunday, May 22, 2011
Working with color for a break
After all of those white doilies, I felt a real need to work with some colors. After starting and stopping a few things, I decided to play with the Valeire Square again. One small doily is drying and a couple more squares are ready for more play. I'll probably work one or two of the designs up in white before I'm done. I find this little square so fun to tat that I keep coming back to it.


Saturday, May 21, 2011
Dragonwing Doily is Finished

Friday, May 20, 2011
Maltese Rings

Untatting today
Today I will get to fix the messes I made of my projects yesterday. I realized I had added a couple of extra double stitches to one of the chains in the Dragonwing doily, but I knew that wouldn't be noticed. However, as I rounded the turn to start back to the center I realized I had added an extra picot to the bottom ring on the previous round. THAT is noticeable! So I picked up the Maltese ring butterfly I've been working on (designed by Jane Eborall). As I'm finishing wing 2, I realized that I'm going to run out of thread before this butterfly has 4 wings and my interpretation of Jane's technique is resulting in a slightly different look. I decided to turn it into a side view as I've learned what I sought to learn from the project. Since it didn't have a head ring yet, I needed to tat my way back to the beginning. The results look awful. I'm going to take those stitches out and either tat my way back to the beginning differently or add in more thread and finish the butterfly.
I was tempted to start a third project last night, but I knew that if I did, these two would wind up as UFOs. I know me. So both are going with me as I run errands with my parents today. I'm hoping that one or both will have new double stitches moving in the correct direction before the day is over.
I was tempted to start a third project last night, but I knew that if I did, these two would wind up as UFOs. I know me. So both are going with me as I run errands with my parents today. I'm hoping that one or both will have new double stitches moving in the correct direction before the day is over.
Tuesday, May 17, 2011
2 Doilies Finished

I've also found some time to play with this week's online tatting lesson (Jeanne Lugert's instructions on alternating colors in Daisy picots), review Miranda's notes comparing the Maltese ring and Daisy picots, and play around with the two techniques. I missed the classroom session, but worked with Jeanne's instructions. While it didn't look to me like it could possibly work, I followed her instructions carefully and there it was--a flower with the daisy picots in alternating colors! Many thanks to Jeanne and Georgia for sharing the technique with us. It's fun to try new things.
I'm currently working on one of Jane Eborall's butterflies in which one seems to use some of both techniques (Maltese rings & Daisy picots). I've emailed Jane to see if I'm working it correctly. Once I finish the tatting and make sure I've correctly interpreted the instructions, I'll show it to you.
Happy tatting!
Tuesday, May 10, 2011
They are back!
While I have no clue what happened, my blog list is back.
With bachelor's degree in hand, I've been exploring the job market. I'm excited about the next step and enjoying the process.
I've also really missed all of you in the online tatting community. I'm eager to catch up on what you have been doing. I managed to log in to quickly read a few blogs once in a while this semester, but that is all. Therefore, I declare today to be a holiday devoted to tatting & blogging. My teapot, shuttles, and laptop are all ready for the day.
Lost blog list
When I logged in yesterday, the list of blogs I follow was missing. I spent two hours finding and restoring some of them only to lose them again. Is anyone else having this problem?
Thursday, March 24, 2011
Working on some small doilies
It is Spring break and some of the activities that were planned provided me with some tatting time as well.
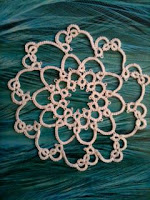
The first doily I tatted this week came out great. I finished Heather Johnston's Mini Doily #21, tatted in all white. I used a thread that is slightly larger than size 10. The finished doily is about 5.5 inches in diameter--just right to sit under a candlestick.
My second effort was less successful. I began one of Roger aka Freedman's doilies using some white, size 20 thread that was already loaded on a shuttle. I took it with me Wednesday planning to finish it in the car. Oh, no! When I had added in more white thread, it wasn't a match! It had not been noticeable in interior lighting, but it was glaringly obvious in daylight! Of course, this addition was back near the beginning of the doily and the two threads were not mixed strategically as I had used the shoelace trick periodically to make the shuttle thread last longer. I really like the way it was looking, so I'll start it again tonight. It's a lovely pattern. I hope to finish it before classes resume next week.
The first doily I tatted this week came out great. I finished Heather Johnston's Mini Doily #21, tatted in all white. I used a thread that is slightly larger than size 10. The finished doily is about 5.5 inches in diameter--just right to sit under a candlestick.

My second effort was less successful. I began one of Roger aka Freedman's doilies using some white, size 20 thread that was already loaded on a shuttle. I took it with me Wednesday planning to finish it in the car. Oh, no! When I had added in more white thread, it wasn't a match! It had not been noticeable in interior lighting, but it was glaringly obvious in daylight! Of course, this addition was back near the beginning of the doily and the two threads were not mixed strategically as I had used the shoelace trick periodically to make the shuttle thread last longer. I really like the way it was looking, so I'll start it again tonight. It's a lovely pattern. I hope to finish it before classes resume next week.
Saturday, February 26, 2011
No Tatting, but reading blogs
I took a vacation this morning from studying to catch up on tatting blogs. It has been wonderful and inspiring. Blips in the internet service may have resulted in some of my comments being sent several times while others didn't make it at all, but I appreciate every one of you who share your thoughts, ideas, and work. Thank you!
This is the last semester for my bachelor's degree. I've thoroughly enjoyed it, but it does shift one's priorities for one's time for a few years. I'm taking 6 classes this semester, so there has been even less free time. Now I'm starting to do some job hunting as well. I look forward to entering this new phase of my life as well as getting back to designing more tatting patterns. I've been scribbling ideas in a notebook without time to follow through.
Have a great week and may all of your knots be the intended ones!
Thursday, February 10, 2011
couple of motif bookmarks

Subscribe to:
Posts (Atom)