Saturday, July 23, 2016

I'm back! & Filet Tatting

It feels great to be back online. It was just too frustrating trying to keep up from the small screen of my cell phone while my computer was being repaired, so I took advantage of my self-imposed blackout to tat in what time was available to me. I'm sometimes amazed at what I manage to get done when life seems so terribly busy, but a few knots here and there really makes a difference.
Lesson 1 (Row 1 of 9)

I've seen a couple of other methods, but Amanda's seems unique in her use of picots to fill the blocks. In fact, it was seeing some of the different effects that can be accomplished in the filled blocks that convinced me I must try this technique. Check out the different ways Amanda filled the blocks in her filet heart motifs at http://www.craftree.com/projects/1202.

I confess row 1 (lesson 1) doesn't look like much at this point. It took some careful manipulation to get the image you see above, but I know it will hold its shape as the next rows develop. In fact, I'm looking forward to working through lesson 2 this weekend.

Amanda chose a small project with a simple diamond design for the tutorial, which is perfect for learning a new skill. Her instructions are very clear, and I love the diagrams. I find it so much easier to follow a good diagram than to keep referring back to the text. 

Well, I'd best get moving. There is laundry and cooking that need to be done today before I can work more on catching up on the blog reading and posting and, of course, tatting lesson 2.

Happy tatting!
SaveSave

Tuesday, July 12, 2016

Computer Problems and a Busy Schedule

A combination designed to interfere with my tatting, my blogging, and my blog reading. Hopefully, the computer problems will be resolved within a few days.

Happy tatting!

Monday, July 11, 2016

Butterfly with Ikuta Overlapping Picots

Motifs 7 and 8 for 25 Motif Challenge (2nd for 2016)
Left: Lizbeth color #112; Right: Flora color #228 (both size 20)

As I promised, here is the first of the reports of my weekend adventures into new techniques (new to me). Georgia Seitz first introduced me to the Ikuta picots (double, layered and overlapping) through the Online Tatting Class on May 2. When I first tried this technique in a ring (my May 9 post), I used one shuttle and a ball thread. I found it a bit tricky to keep my threads in the proper position to get the correct overlap. The step-by-step tutorial that muskaan put together for us beautifully clarified the technique for me with clear instructions for handling the two threads.  I found her use of two shuttles to be much easier, and I was able to remember the process to produce this 2nd butterfly the day after carefully following the tutorial as I worked through Ninetta's pattern to tat the first butterfly. The tutorial works! Thank you, muskaan.

I love this little butterfly. I had a little trouble with the first butterfly's 3rd and 5th rings. These are the rings that encircle rings 2 and 4 forming the upper parts of the wings. My outer rings weren't large enough. After looking carefully at the picture in Ninetta's pattern post, I tried a count of 8-8 for the inner rings with the green thread and I think it looks much better. I must say, though, that muskaan used the 14-14 count from Ninetta's written instructions and hers looks great, so it may just be a difference in tatting tension that made the smaller inner rings work better for me.

In addition to gaining confidence with the Ikuta Overlapping Picots, Ninetta's pattern also inspired me to learn the Ann Dyer Join to the Smooth Side (JSS). I used Karen Cabera's YouTube video for instruction. Karen does a great job. I think my efforts with this join got better with practice. The join in the upper right wing of the green butterfly was my 4th attempt and I did a better job of 'popping' the threads into position. It looks beautifully smooth! Thank you, Karen and Ninetta.

I have to say that when I first tried the Ikuta picots, I didn't really think I'd actually use them. Now, I think I'll enjoy adding this picot effect to some of my projects. And the JSS is a definite keeper.

Happy tatting!

Sunday, July 10, 2016

Snowflakes completed for June and July (Motifs 4, 5, & 6 for 25 Motif Challenge)

My plan was two a month and I got behind by two in June. Now I'm caught up through July. (Join us in the Craftree tatting forum as we tat Lene Bjorn's 24 Snowflakes in Tatting before the year ends.) You'll notice that I skipped a flake this time. I will come back to it later when I have time to practice that frustrating split chain some more. :)
Twelfth Day of December 
White, Size 30 DMC, approx. 10cm in diameter
It isn't missing a chain. I didn't notice that one of the chains had folded over behind the ring when I took the photograph. I really like this one.

Fourteenth Day of December
White, Size 30 DMC, approx. 10cm in diameter
I like the way this one looks, but it isn't without mistakes. The small chains in that outer round that are side by side are not identical, at least they aren't supposed to be. I made a mistake with the very first pair and didn't notice until a couple of repeats later. I didn't cut it out, but, determined not to have any more of those mistakes in the piece, I found myself untatting several times. 

Fifteenth Day of December
White, Size 30 DMC, approx. 10cm in diameter
This one is a mess. It looked like a bowl as I finished the tatting.  My rings should have had larger picots. I struggled to keep those chains looking smooth, but I also was running short of thread on my shuttles as I neared the end. I was tatting with the bobbins and changing shuttles to avoid having to add in new thread so close to the end. Can you see where I did the shoelace trick in that top left chain? Note the breaks in the curve. The ends of this one had to be knotted and cut as one of them was less than an inch long. That was close! I hope my own failure with this one won't keep others from trying it. I think the design is a lovely one. Just remember to use the picture as a guide to picot size. Most of them must be fairly long.

The children and grandchildren were all out of town yesterday so I found some time to work on learning something new. I'll be sharing more about my explorations later. 

Happy tatting!


Wednesday, July 6, 2016

Eleventh Day of December

I'm just now catching up on my goal for the Craftree Challenge of tatting all 24 snowflakes from Lene Bjorn's 24 Snowflakes in Tatting this year. My personal goal has been two snowflakes a month, and I didn't tat any of them in June. I've been needing simple projects for my tatting time lately, and the Eleventh and Twelfth of December qualify.
Motif #3 for 2nd 25 Motif Challenge of 2016
DMC Cebelia size 30 in white
just over 8 cm in diameter
I decreased the size of the picots.


Saturday, July 2, 2016

Tea Cloth - Round 5 of Test Tat is complete

I've been getting some tatting done on those projects that don't require frequent glances at the instructions. You saw the completion of the Concentric Rectangles doily in my last post. Here is the tea cloth test tat with round 5 completed.
I have one more row of motifs to add before the test tat of the center is done. If you would like to see how this doily looks in color, check out Jessica's. Jessica has done a great job on the pattern update of this doily. 

You don't have to tat for very long to discover that occasionally you have to make a small modification to a pattern to make it work with your finished product. Maybe your picots aren't quite the same size as the original design or your tension is different. It is less likely to be a problem with small motifs, but doilies are another matter, especially as the diameter increases. Such was the case on this round. Even though I knew the motifs of round 4 would elongate, I just didn't feel there was enough space between my motifs. I tried several different ring sizes to see how they would work, but none of them gave the same kind of look as those larger rings. I finally opted to join the inner most rings in hopes that it would at least keep those rings from trying to overlap each other. I'm pleased with the way it is working so far. The real test will be how it works with the addition of round 6.

Wednesday, June 29, 2016

Concentric Rectangles Finished

One project checked off my WIP list as the Concentric Rectangles doily is finished.
Concentric Rectangles by Edda Guastalla Bianchetti
with modified corners in final round
26 cm by 18.5 cm (10.25 inches by 7.25 inches)
Size 20 thread: Flora 204 (yellow), Lizbeth 105 (variegated), Lizbeth 663 (blue)
Motif #2 for 2nd 25 Motif Challenge for 2016

I reversed work between rings and chains as in traditional tatting. but I used up-joins when joining the rounds together that join ring to ring and down-joins when joining the rounds together that join chain to chain. This kept all of the color blips on the same side. I also modified the corners of round 5 by adding an extra clover and chain, producing a point in each corner.

The angle of the picture makes the sides look slightly distorted, but they are nice and straight producing a pleasing rectangle.


Monday, June 27, 2016

Round 4 of the Test Tat is complete

Hi, everyone. I managed to tat round 4 of the test tat for Jessica of the Sander's Tea Cloth. It is currently 19.5 cm, or 7.75 inches, in diameter in size 40 DMC Cordonnet. I'm a little concerned about whether there is enough room to properly insert the next round of motifs between those of this round, but I'll give it a try.


The final round of the Concentric Rectangles doily is underway, but I made a change to the corners  so I'm going to keep you in suspense until I can post a picture of the whole.

I continue to purposely lag behind on the Renulek doily. My start of round 10 with purple rings and white chains really doesn't appeal to me so I plan to cut it off and begin again.

Thank you to all of you tatting blog writers. While my tatting has been limited to easy projects that can be picked up and put down often, I've been popping in to see what the rest of you are doing. It's inspiring to follow your progress.

Happy tatting!

Monday, June 20, 2016

A little tatting and a little blog reading

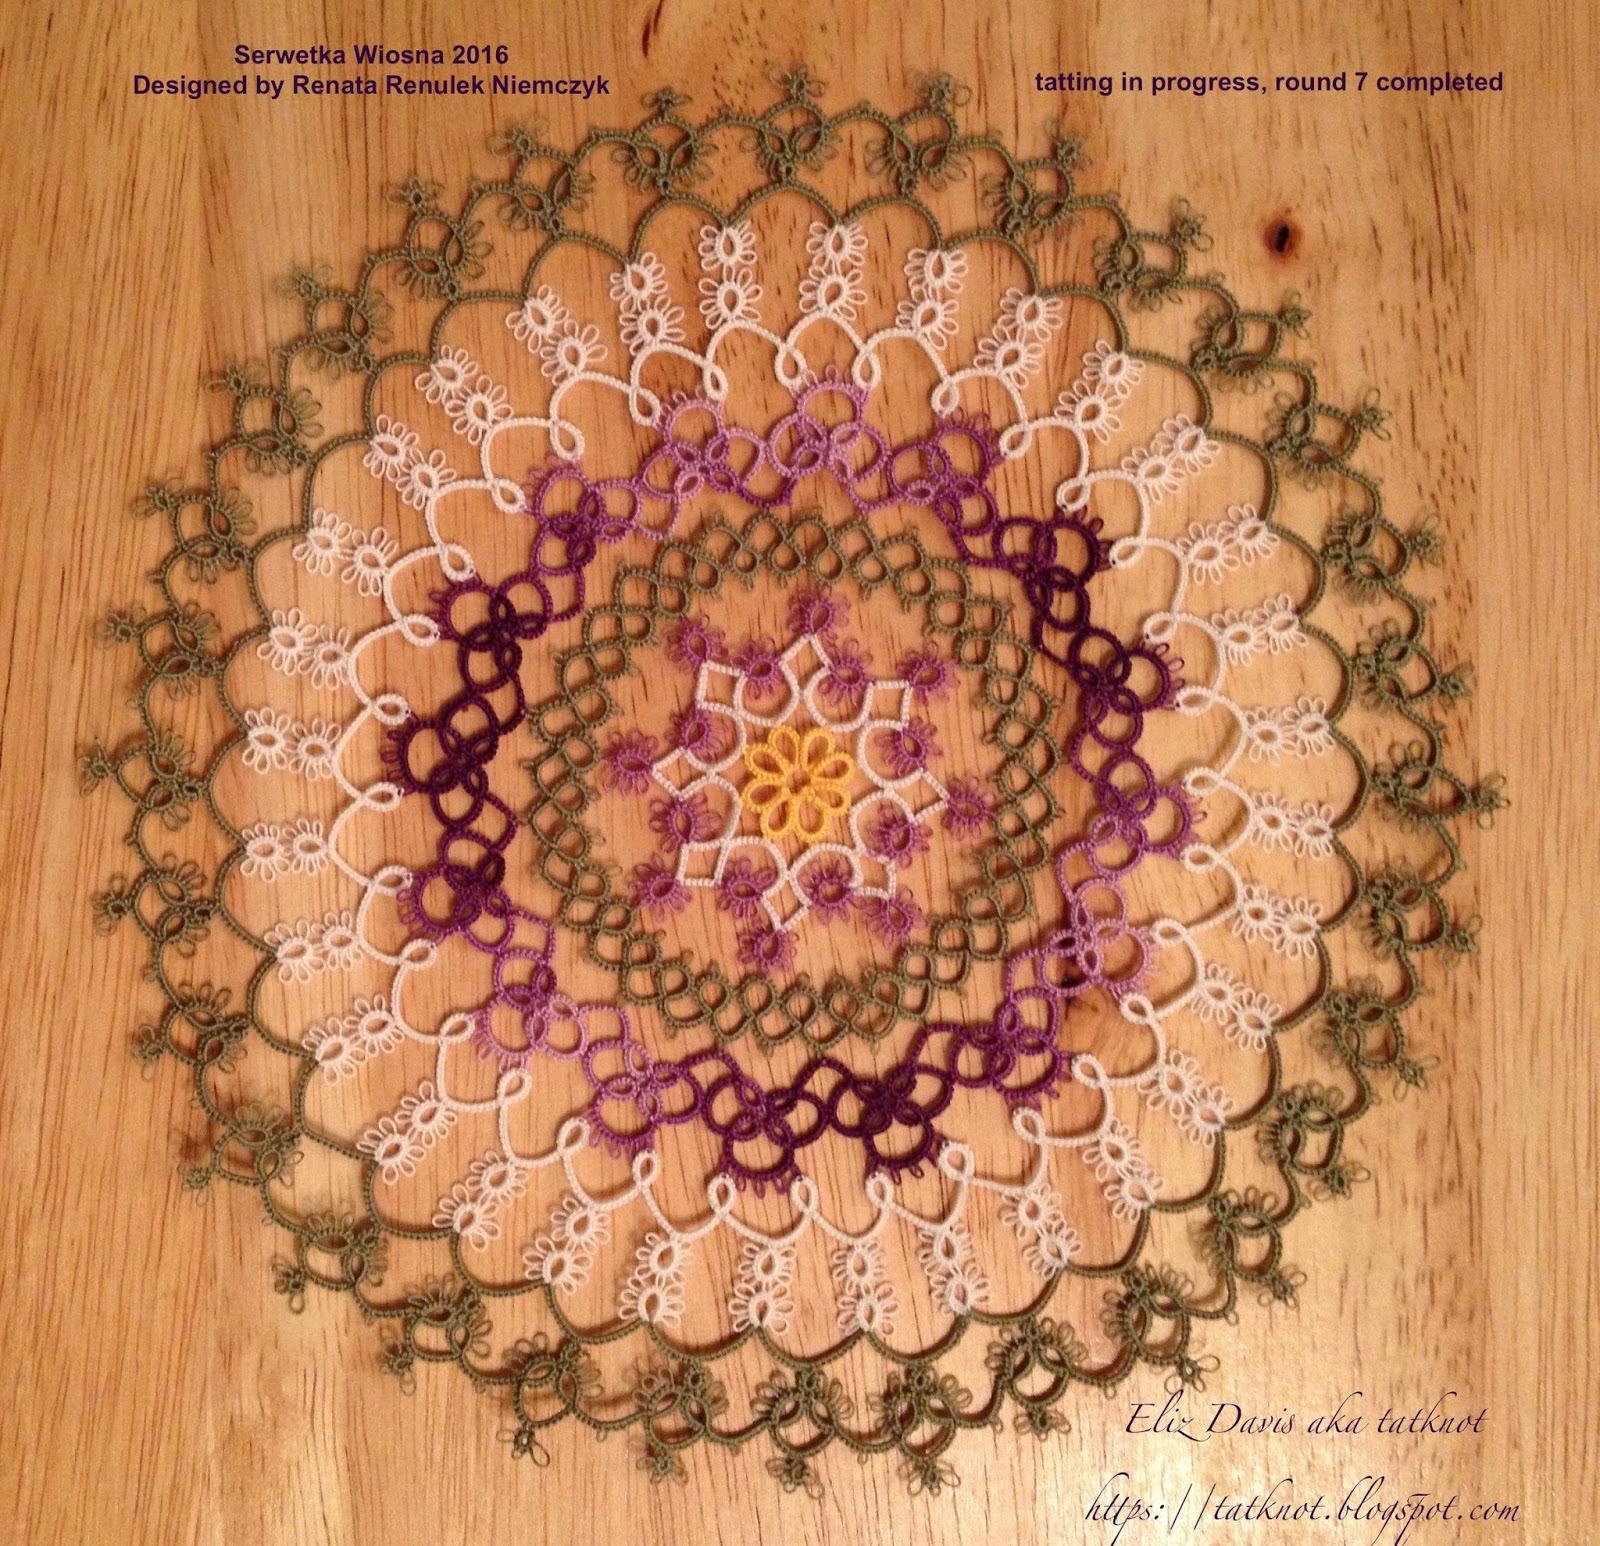
As you can see, I managed to add a round to Renulek's Spring doily, but I'm still way behind. I'm content with that, though, because it gives me room to better plan the colors.

I'm struggling to keep up with blog reading as I love seeing what the rest of you are doing, but it's a busy time of year here at home. I'm getting a little bit done now and then on the Concentric Rectangles Doily and the test tat for Jennifer by carting them around everywhere I go, but I'm just not getting much computer time. Keep the tatting and blogging going. Things will slow a bit starting next week, I think. Meanwhile, I'm enjoying time with my family.

Happy Tatting!

Wednesday, June 15, 2016

WIP Wednesday

While I haven't accomplished much tatting in the past week, I managed to be close to finishing a round in each of three of my projects. I made it my goal today to complete those unfinished rounds.
The Renulek tat-along doily is just over 20 cm in diameter at the end of round 8. I'm still behind by a few rounds, but I'm not going to worry about that. (Size 80)

The image on the top right is the tea cloth test tat I'm doing for Jessica. At this point I've completed round 3. The next round is several motifs with two rounds each. It is approximately 12 cm in diameter so far. (Size 40)

The bottom image is the Concentric Rectangles doily. Just two more rounds to go, although Edda says you can keep going to make it as big as you like. It is 15 cm by 22.5 cm thus far. (Size 20)

Wednesday, June 8, 2016

Test Tatting

While I haven't tatted since the weekend, I do have a little bit of tatting I can share with you. I started test tatting the adaptation of a 1915 tea cloth pattern which has been done by Jessica Spaulding. You may have seen her beautifully colorful tatting of the center of this large piece at her blog. When I was much younger, the idea of doing a large piece of tatting did not interest me at all. I find, however, that the idea now intrigues me. I like the idea of making something a bit spectacular. I'm not yet up to a tatted bedspread (I've seen and touched a gorgeous one!), but this I think I can do. I chose size 40 DMC Cordonnet in white. It looks ecru in this photo, but it really is a nice white. At the completion of the bottom of row 2, the piece measures 4.5 cm.
Life has been full of grandchildren, baseball (5 games this week), and other child-related activities. We even made a trip to the zoo today. Butterbean is cutting 4 new teeth at once which has been trying at times for both of us. I've also got some sewing started. Tatting is low on my priority list for this week. At least one of the doilies I have in progress is always with me just in case, but the practice of new techniques like filet tatting and Ikuta overlapping picots in a ring will definitely have to wait.  I love learning new things, so I can't bear to put either of those off much longer. Hopefully, I shall get to them next week. That's the plan anyway.

Don't be surprised if you don't see another post from me before the weekend, but I'll try to pop in to read your blogs now and then.

Happy tatting!

NOTE: If you want to see a scan of the original pattern showing what the final full-size doily looks like, Jessica has it here. I'm not sure how far I will go or what changes I may make as it gets larger, but I really like the center.
SaveSave

Saturday, June 4, 2016

Finished Row 7 of Spring 2016 Renulek Tat-along Doily

Row 7 of Renulek's tat-along doily is now complete all in green. If you want to join the fun, the pattern starts here in her blog.
19 cm in diameter in DMC size 80

I think some of you will appreciate the use to which I put that failed effort at making a supersize Spinning Wheel Mat. After cutting the glass beads out, I gave it to Butterbean. She looks like she is pretending to tat it with her Tatsy shuttle, but who knows. She doesn't have enough language skill yet to tell me. :) Please forgive the slightly blurred photo. She was very busy.

Thursday, June 2, 2016

Ikuta Layered Picots

I opted to work on muskaan's Ikuta tutorial part 2 last night instead of my WIP after figuring out just what I need to do next on the WIP. I've been wanting to get to this ever since she put it up. As I commented at her blog, her tutorials are really helping me to have a solid feel for where my threads are and need to be all the time. I truly think I just got lucky when I worked through the class material the first time on my own because my tatting looked right, but I really didn't fully understand why or why not, if you know what I mean.
The first ring was made with the shuttle thread picots to the front. I thought that one would be the easiest one as it seemed obvious to keep the shuttle threads to the front. I found it hard to keep both threads on my left hand, so I resorted to dropping the ring thread off my hand each time.

My second effort (bottom left) was an attempt to keep the ball thread picots to the front. While you can't tell from the picture, I let my threads get messed up so that some stitches wound up upside down which also messed up the alignment of the picots making it appear one was missing. It took some major pushing and pulling to get everything back in place since I didn't notice it until I had closed the ring. To make sure that was just a fluke, I tatted it again (bottom right). As you can see my work is getting better looking with the 3rd ring. I have to say that, for me, tatting with the ball thread picots to the front was the easiest. I started out trying to keep both threads on my left hand with the ball threads to the front, but it just wasn't working out. I started tossing the ball thread over the back of my right hand to keep it out of the way when not in use. When I needed to tat with the ball thread, it worked best for me to open the ring loop large enough that it could slide back on my left hand a bit, thereby making room for the ball thread to take its place temporarily in front.

Tatting of Ninetta's butterfly has been delayed until I can work with the next installment of muskaan's tutorial which I'm sure will cover overlapping picots in a ring.

Happy tatting!

Wednesday, June 1, 2016

Latest WIP Wednesday Project

Kersti's Craftree WIP Wednesday challenge is great incentive to pull out some UFOs (unfinished objects). Just committing to working on the last one every Wednesday kept it in my mind so that it got picked up more often than that.

The piece I've chosen as my next WIP Wednesday project is a handkerchief edging that I started back in the middle of 2011. Diane the Lace-Lovin' Librarian gave me this beautiful handkerchief. I started Mary Konior's Beaded Braid, Tatting with Visual Patterns, page 9. Tatting went into hibernation for a good while and, by the time I was puttering at it at least, I had misplaced the project. I found it again just a few weeks ago.


Tuesday, May 31, 2016

WIP completed

I'm still struggling with migraines so I've been grateful that I had two projects in process that were easy to follow. That didn't keep me from needing to un-tat a lot, but both use size 20 threads so it wasn't difficult to do.

DMC Cecelia size 20, Ecru
Finished size: approximately 21 inches or 54 cm
Motif #1 for 2nd 25 Motif Challenge for 2016
The first of Renulek's full-sized doilies that I've tatted, but I loved it. 


I've also made a little progress on round 4 of the Concentric Rectangles doily. The corners are the part that gave me trouble this week. I say corners even though you see only one in this picture. I've just un-tatted a corner and got it going correctly again. If you are thinking about trying this doily, don't let my difficulty with the corners deter you. I was tired and in pain, but really wanted to tat anyway.

Colors have been chosen for rounds 7, 8 and 9 of the current Renulek tat-along doily. I'm just reluctant to tat on that one until the headaches clear up. Un-tatting with size 20 thread isn't too bad, but size 80 is more of a challenge, and I'm working in low light as well. Hopefully, the weather will stabilize and I'll get some double stitches done on that one, too. I'm also eager to get to muskaan's part 2 tat-along of the Ikuta Picots. I really look forward to tatting Ninetta's butterfly.

Happy tatting, everyone!


Sunday, May 29, 2016

Blog Updates

Hello, everyone. Migraines have troubled me every day this past week as a result of all of our unsettled weather. It doesn't look to improve much in the next few days. What little tatting I've done this week has been on projects with simple repeats, and I've still done almost as much un-tatting as tatting. I did manage to make some updates to the blog and blog links this weekend though.

Many thanks to muskaan for the techniques and links she has provided for Element-al Approach to Tatting. All documents have been updated and the Techniques document is now available in both Word and pdf formats with active links. You'll find them by clicking on "Tatting Techniques" in the blog menu above. These are works in progress so your help is invaluable to making them better resources for all of us. Send me a link to tutorials and practice patterns. If you see I've omitted a technique or idea from either document, please let me know.

A click on "My Tatting Patterns" in the blog menu will take you to the latest pattern updates. At the request of some of you, I added the instructions for the motif I used to try looping a chain back on itself to form a mock ring and the instructions for the edging that I used to compare consecutive vs simultaneous joins.

Happy tatting!

NOTE: All links to tatsall webpages were working earlier today, but are now returning, "You are not authorized to view this page." Is anyone else having a problem with these links? "Ruffled picots" and "Stiffening" are just two of the techniques in the Elemental documents with links to this website.

Wednesday, May 25, 2016

A Quick Update Before I Move on to My WIP

My grandson put in a special request for a snake bookmark after seeing the wonderful collection in Dianna Stevens' Animal Bookmarks, A Tatted Zoo. He chose Lizbeth color #100 (Falling Leaves). I used Lizbeth color #694 (Harvest Orange) for the head. Both are size 20. It is marking his place in his latest read.
Motif #25 for the 25 Motif Challenge

And just in case you want to see how ridiculous it looks to try to make the Konior Spinning Wheel Glass Mat 5 times larger, here it is. I started out from the center as BattyTatter suggested to make it easier to join the final arm to the first. Looks more like a horseshoe, doesn't it? It's okay to laugh. 
I'm excited to see that Renulek has released another round for the Spring 2016 WIOSNA. I'm definitely going to make some decisions and get caught up, but that will have to wait for tomorrow.
For now, I'm off to do some tatting on my WIP Wednesday doily. Just four more arches to do and that doily is finished. Maybe today will be the day.

Update: I managed to complete one arch this evening, but that makes 4.5 completed since last Wednesday. Only 3 arches left to go.


Tuesday, May 24, 2016

Starting Them Right

Today was the first day of summer vacation for my grandson. Since I semi-retired last summer, I'm looking forward to lots of time with him and his sister this summer. I've been hearing for months that he wants to learn to tat, so we started with finger tatting today. I worked the left hand and he worked the right hand. He caught on to his part quickly. We made his first ring.
Little sister also wanted in on the fun. In fact, she has been very interested in my tatting lately. So here she is playing with some thread and one of my Tatsy shuttles. 
I've been battling a migraine since early afternoon so I'm working in near darkness this evening. Since that is not enough light for good photos, there won't be any visual updates on my tatting projects today. I've already trashed the lasted project which was an expanded version of Mary Konior's Spinning Wheel Glass Mat. I've seen a couple of successful expansions of the pattern to twice it's size by increasing the number of rings per round, but I discovered that there is a definite limit to how far one can take that idea. I tried increasing the number of rings by five which was a disaster. It circles back around on itself too much. If I had thought that out well before I started tatting, I would have realized it without putting the idea in thread. I don't think very quickly or clearly before or during a migraine, so I'm blaming it all on the headache. 


Saturday, May 21, 2016

My Concentric Rectangles Doily is Rather Stiff

This is turning out more beautiful than I expected. I've been disappointed in this variegated color when I've used it alone, but I really like it paired with some coordinating solid colors.
by Edda Guastalla Bianchetti
Rounds 1 - 3 completed so far.

My one regret so far is that I wish I had started over when I saw how stiff the center tatted up. I've emailed Diane (see previous post about this doily), and we both think that making the picots larger would resolve the issue. Both of us plan to try that in our next doily from this pattern, but I'm too far along to want to start over and you don't change something like that in the middle of a project.

This pattern is a pleasure to tat. The change in colors and the alternating instructions for each row offer enough diversion to make it interesting, while the pattern itself is simple to follow. I've found I need to consult the pattern only at the beginning of each round and at the first corner of each round. It's a great project to work on while doing something else with the family. I took it to the ball park last night and tatted while waiting for my grandson's game to start. I could still follow the warm-up on the field and visit with others while I worked. 

Wednesday, May 18, 2016

Following muskaan's Picotgate Tat-along Tutorial

If you have been at all curious about the Ikuta picots, make your way to muskaan's excellent tat-along tutorial.


muskaan asked, "Is it perle tatting?" I say no. Perle tatting results in bumps or picots on either side of the core thread. I played with a couple of different ways to create the look of perle tatting in a chain, but that will have to wait for another post. Thank you, muskaan, for the tat-along tutorial on the Ikuta picot effects. It is very easy to follow and understand. 


WIP Wednesday progress

I think I got about four more arches finished on the Renulek Serwetka Wiosna 2014 doily today. Just 7.5 left to go.


Tuesday, May 17, 2016

Online Tatting Class - practicing folded rings & copyright

I tatted Sheila Heneise's Angel with Paisley Wings before class (first angel on the left). After class, I tatted it again trying Martha Ess's instructions for folded rings in the chains. I found it a little tricky, but I got better with practice (moving left to right). The technique is not necessary to tat this little angel, but it proved to be a good practice piece for the technique. It's nice to know more than one way to get the look. Feeling curious about how a button might look in the bodice, I hunted out a small two hole button to add to the last one. I think this button is still a little too large, though.

Motif #21, 22, 23, and 24 for the 25 Motif Challenge
Cebelia size 20 white

Georgia shared some great information with us last night about copyrights, too. I know many of us try to take great care to acknowledge the designers when we tat. I provide links, or the title of the book, wherever possible as do many of you. This is one of the ways I feel we can properly credit the designer or the person who has permission to share the design. I've also decided to start putting as much of that information as I think reasonable onto the images as well. That way, if someone finds the image in a search, they will get that information as well. If you ever have any objection to a link I've shared to your work, please let me know and I will remove it.

Consider joining the Online Tatting Class. You'll be glad you did. I can't always make one of the sessions live, but I can catch up by reading the class log. Help is always available if you have any difficulties. See the tatting of other class members on the Tatting Class Homework blog.

Sunday, May 15, 2016

Planning Color in Tatting

Another project in progress and its colors:
I chose to add to my projects in progress yesterday by starting a Concentric Rectangle Doily. I've been tempted since I started following Diane's progress with a couple of these. I have a couple of variegated threads that I have had the hardest time deciding how to use. They've been featured in a few small bookmarks, but nothing else. It had occurred to me that it might be interesting to use a variegated thread in one of those concentric rectangles. This variegated is the thread I used in the mock ring experiment a couple of posts back, Lizbeth size 20 color 105. Diane's use of color provided the color repeats: Row 1 and 5; row 2 and 4, row 3. I just chose a couple of threads from my stash that match colors featured within the variegated thread and began. I haven't a clue what I'll do with it when finished! (NOTE: I took it to a fellowship event this event so I had something to do while others ate. One of the young women told me she loves the colors. They are the colors of her bedroom. I told her it will be hers if she wants it. She seemed pleased, and I'm glad it has a future home.)


Colors in Round Robins and Tat-Alongs - Such a difference!
I've participated in several round robins over the years which were made in color. Each of us selected a few colors we would like to see in our finished doily and we tatted the center. Then the project, its threads, and the instructions for that center moved to the next person in our group. Each of us added a round and the instructions to the project as it moved through the entire group. 

muskaan shared some wonderful tips in her blog about selecting colors for the different rounds in a doily. She told me about this in the comments of yesterday's post. She has some great insights there. With the help of those who shared comments with her, she puts terms to some of the concepts I just instinctively applied in planning. 

When a project arrived at my house, I spent time thinking about what the project needed next in order to move forward. It was important to keep in mind the number of people to come along behind you as you planned your round. (You can't be the one to add that spectacular attention-getting round to every project.) In reality, sometimes it took a couple of rounds to do what you felt needed to be done at your point in the project. Selecting the color from the package to be used in your own round(s) was a matter of determining what is needed next from this group to keep the project flowing. You know that each tatter behind you will carefully consider the way color has been used in the design thus far, as well as the design itself, in the planning his or her own additions. The last person to get the doily before returning it to the originator had the task of pulling it all together with that final addition to give it a finished appearance. 

Believe me when I tell you that this was much easier than selecting colors for a Tat-Along that is being designed in one color! Let me say that I LOVE tat-alongs! The latest Renulek WIOSNA is the first time I've tried to do a tat-along in colors. I started by choosing colors I'd like to see used together, just as I did for planning my own round-robin doily. I found the first tatting to be the easiest as the first three rounds were revealed all at once. At least one other round I waited until the reveal of the following round before tatting the next round. That has seemed to make color selection easier.

Perhaps I'm making it all more difficult than it need be. Maybe I should look at the round to be tatted and just ask which color will help this doily continue to flow (my term that encompasses a lot of what muskaan describes in her post linked above), knowing that there is at least one more round to go. I shall have to think about that some more.


Round Robin Doilies in Color (that I participated in)
Just in case you would like to see a few of the round robins I've worked on, I'm sharing a collage below. It was the job of the final tatter, or the originator, to share the pictures and pattern with all of the tatters at the end, and that often didn't happen. I'm sorry to say I have images of only three of them (and they are not the best image quality). I know three is not a very large sampling. Some of the others contained a wider range of colors.

I added the last round in white to the one done in pink, blue, and white in 1997. The purple one and the brown one were made in the same round robin in 2000. I added the final two rounds to  Sue Hanson's purple one. She added the final rounds to my brown and ecru one (I wasn't very adventurous, I know). Notice that Sue used crochet to add the final finish to the last round of mine. 

Happy Tatting!


Saturday, May 14, 2016

Round 7 Experiments (Renulek Spring 2016 WIOSNA)

Even the Prismacolor pencils failed me in planning the colors for round 7. Maybe part of the problem was that I didn't particularly favor or dislike any of the options I tried. I started out using purple and yellow, but I really didn't like it. It's a simple round that will be quick to tat, so I decided to experiment with the actual threads.

Having just downloaded CollageITfree to my Mac, I put the images side by side to help me make up my mind.

Viewed this way, the last two appeal to me the most. I'm going with the yellow and green, though. I like the brightness it brings to the doily at this point. So now it's time to cut all of these experiments off, reload the shuttle, and start again.

UPDATE: So after all of that, I've decided to wait until I see the next round before doing anything at all about this one. Now that you've had a glimpse into how my mind works, you probably wonder how I manage to get anything done.

Friday, May 13, 2016

Mock Ring by Joining Chain Back to Itself

Motif #21 for the 25 Motif Challenge
Lizbeth size 20, color #29410
Finished diameter of 4 cm.
Jane McClellan has been working through the motifs in The Tatted Artistry of Teiko Fujito. When she posted Motif #11 and Motif #13, I wondered how it would look to use a chain that looped back to join to itself. I'm sure this have been done plenty of times by others, but it's the first time I've tried it. Here are my experiments with the idea:
A few notes that will help you try this: 1) Always keep your shuttle and ball threads to the back of your work as you are joining. 2) I gently pack my chain stitches together before every join to help ensure that the chain's tension is even throughout.

If you'd like to try this motif, the small rings are 3-4-3 and the chains are 20-15-5-15-20. 
Start with a small ring. 
You'll always join to the last ring tatted with the third picot of the chain. The last picot of the chain is a join back to the first picot of the chain. (20-15-5+15+20) Form that last join by pulling the ball thread up through the picot and posting your shuttle from front to back.
The final chain will be 20-15+(join to first ring) 5+(join to last ring tatted) 15+(join back to first picot of this chain) 20 and join back to base of the first ring and finish off your motif as preferred.

If my pictures and instructions aren't clear enough, please put your suggestions in the comments. All help is appreciated. 

Thank you, Jane, for inspiring me to try something new to me.

Have fun!

Update added 5/15/2016: If you would like to see a comparison of some of the different ways to handle a mock ring in a position like this one, check out muskaan's post on the topic.


Thursday, May 12, 2016

Tenth of December

Motif #20 for 25 Motif Challenge
The Tenth Day of December
from 24 Snowflakes in Tatting by Lene Bjorn
DMC Size 80, Color #67 (Variegated Baby Blue)
Finished size 6.5 cm

This one tatted up quickly. To keep on target for the Craftree challenge, my goal has been to complete two from this book each month. Having met my personal goal for May, I'll devote my tatting time to trying a few new things. I've printed Ninetta's butterfly pattern that uses the Ikuta picots so I can practice them a bit before I forget how to do them. I also saw that Renulek posted the next round of the Spring 2016 WIOSNA doily. I think I've settled on my colors for this round, but it was tough. I'm eager to get some more yellow into the doily, but the rounds haven't seemed right for it yet. If my first choice for colors doesn't seem to be working like I wish, I'll cut it off and go with my second choice which picks the yellow up again. I would still like to do another Morfo butterfly, too. 

Happy tatting!

Wednesday, May 11, 2016

WIP Wednesday

I've been struggling with allergies or a virus this week. Since I didn't feel like doing much, I've spent more time tatting and watching episodes of A Nero Wolfe Mystery. I somehow missed that series when it was playing originally. The results has been more progress than usual on my Spring 2014 Renulek doily, my designated Work-In-Progress Wednesday project. I think I've completed about 10 of the scallops on the final round. It measured 54 cm (21 inches) before I started this round. The thread is Cecelia size 20 in ecru.

Tuesday, May 10, 2016

Ninth Day of December instead of Morfo #2

With two mangled tattings of the Morfo back in my trashcan, I decided that it's time to tat something else for a change. Was it the thread I chose? Was I too tense and it was transferring to my tatting tension? Who knows! Solution: Tat something else for a while. 

So I've returned to the snowflakes I want to tat this month to keep up with the Craftree Challenge to tat all of the snowflakes in Lene Bjorn's 24 Snowflakes in Tatting by the end of the year. The Ninth Day of December contains lots of block tatting. I tatted the Eighth Day of December using Lene's instructions for block tatting with ball and shuttle. Being determined to give her instructions for block tatting with two shuttles a fair chance, I decided to use two colors for the Ninth. That way I couldn't change techniques mid-flake. Charity921 tatted an impressive Ninth Day of December in navy and white which really inspired me. Having started a collection of my own red and white snowflakes that I call candycane snowflakes, I opted for red and white.
Motif #19 for the 25 Motif Challenge
Manuela #052 (red) size 20 
Cecelia (white) size 20
Finished size: 10.5 cm

I love Lene's instructions for block tatting, but I have a definite preference for her ball and shuttle method. I don't think I'll use the two-shuttle method again unless I need it for color changes as in this one. The two-shuttle method is just so much slower. You never move the ball thread from your left hand in the ball and shuttle method. As you can imagine, that let me move along rather quickly. I will concede that the edges of the two-shuttle method are a little more 'finished' looking, but while this might be a consideration with a large thread, I don't think it would be noticeable in a small thread such as size 80.

Monday, May 9, 2016

Ikuta Picots

I finally found some time earlier today to play with the Online Tatting Class lesson materials for this one. I concentrated on Method 3 as it provides a look that is different from any other techniques of which I'm aware. You'll find the links here under the May 9, 2016 class materials. This turned out to be one of those rare days when I could attend class as well. However, I received an important phone call just after class started, so I had to read the discussion afterward. Georgia Seitz provides a link to the class discussion at that website, so you, too, can read what you missed.
I got off to a few false starts trying to watch a video (not tatting related). I should have known better when I was trying to learn something new. This is the only one worthy of showing. As you can see, I was making the double stitches in the correct places with nice picots, but they are not alternating. All red ones are to the front; all yellow ones are to the back.
 
So, I tried again. I had loaded my thread onto two shuttles. The hardest part of this for me was making sure that the threads were in the right position to overlap. I ran out of thread on my shuttles (remember all of those false starts I mentioned earlier), so I reloaded shuttle one and just used the loose thread from shuttle two as a ball thread in tatting the second ring. Oh, that was so much easier. If I forgot to concentrate and keep those threads in the right position, I just grabbed my crochet hook and pulled that loose thread through where it belonged. Muskaan has provided lots of detailed pictures to help us all out. They are linked from the class website or you can go there directly.

This is another design element than can replace a ring in our tatting. The main appeal to me is the effect produced by using two colors. While I have no immediate plans for its use, it's fun to learn something new. I also have another technique I can use when I just want a slightly different look in a familiar pattern. I'll definitely add this into the next update of Element-al Approach to Tatting Design.

Sunday, May 8, 2016

Round 6 of Renulek Spring 2016 doily

I pulled out my Prismacolor pencils and tried out a few combinations before starting to tat. Here is the result.

Saturday, May 7, 2016

My 1st Morfo in Natural Light

Artificial light seems to rarely do justice to color, so I wanted to get at least one nice picture of Morfo in daylight. The colors are much truer in this picture.
The beads in the center of each wing, beneath the tatting, are clear iridescent beads. I love the way they pick up the color of nearby objects.

Someone asked me about bead sizes. I keep a collection of interesting beads, many of them were once part of necklaces. In fact, I used four different necklaces for seven different sizes of beads for this butterfly. I also used seed beads from a bag of inexpensive glass seed beads of mixed colors that I once picked up at Hobby Lobby. I've used the blue, purple, and pink ones from that assortment. The largest bead is the one in the body of the butterfly. It is 1.5 cm in length. I sewed it in vertically rather than horizontally as it is oblong. If you make the butterfly following Angela's instructions exactly, you will not use as many different sizes and colors of beads.

Friday, May 6, 2016

My 1st Morfo Butterfly is Complete

It's done and I love it! I admit it was a challenge. I was determined to use some lovely beads I had on hand, and I had to go digging several times for the 'right' beads to go with them, but it was worth the effort. Angela Gambka has designed a wonderful pattern that is so versatile. I used her videos without sound to see how she handled bead placement in the original. There were a few times that I cut the sewn in beads out and started over because I wanted to try something a little different. I'm very happy with the result.
Note: The lighting is still artificial, but I just couldn't wait till daylight to show you how it turned out.
Motif #18 for the 25 Motif Challenge
Flora size 20 in color #227 with assorted beads
4 cm across widest part of wing span; 4.5 cm from tips of antennae to lower wing tips

Marie, I understand your fascination with these butterflies now. I'm looking forward to starting another one. In fact, I plan to clean away everything and then go digging for the beads for the next one. I'm thinking red, black, and gold this time.

Kathy, you asked me earlier about the bead placement that looks like two rows of beads in 4 of those rings on the front of the butterfly. You load all of those beads onto your shuttle with those for the outer row coming off the shuttle before those on the inner row. When you wrap to start the ring, you need all of those for the outer row within the circle. When you slide one of those beads into place at a picot, you slide one from the shuttle into place beneath it on the core thread. It's the same method that forms the 4 beaded tips to the wings. The dark bead is on the core thread and the lighter ones are enclosed in the picot.

Side 1 of Morfo is Beaded

I'm sharing my progress as I go in hopes that it will encourage some of you as you begin. It's challenging to do this the first time, and I've probably made it more so because I already had some beads I really wanted to use that aren't the suggested sizes. I haven't taken the time to manipulate all of the rings back into shape before posting, but here it is from the top and the side, but still with artificial light.

Wednesday, May 4, 2016

Front of Morfo Butterfly

The front side of the butterfly is tatted. As you can see, some of the beads are tatted in. I've used pink and dark purple beads so far with this size 20 Flora color #227 (a soft shade of blue). Next will be the addition of more beads with needle and thread.

Tuesday, May 3, 2016

Progress

It's been a busy week so far with very little time to tat. I managed a couple of repeats in the final round of the doily tonight. I also spent some time selecting the beads for the butterfly. Those that will be tatted in are loaded on the shuttle.

Sunday, May 1, 2016

Angela Gambka's Morfo Butterfly

Marie has shared several lovely butterflies that she has made with Angela Gambka's Morfo Butterfly pattern through her blog, West Pine Creations. I've found them inspiring. I've had it on my tatting list for quite a while. Today was the day. Marie has been a tremendous help. I've practiced by just tatting the back piece several times. Here are a few of my efforts. I feel the blue one is good enough to use, so I'm going to load some beads for the top one, which I hope to tat tomorrow evening.
Have a wonderful week, everyone. I hope to have a finished butterfly to share with you before the week is over.


Saturday, April 30, 2016

Doily Progress and a New Tatting Buddy

Deciding upon the color of the next round of the Renulek Spring 2016 WIOSNA doily really wasn't as difficult for me as the first few decisions. I went with all white for this one. The tatting progressed rapidly, too.

While I'm pleased to have made such progress on this doily today, the real highlight of my weekend was meeting and tatting with Scott. Scott found me through the Craftree forum and reached out wondering if I would like to meet. Would I ever! So we met at Barnes & Noble in North Little Rock today, and I was amazed to discover as we left that we had spent three hours sharing our tatting. The time had just flown by! Scott taught himself to tat with the help of YouTube videos. While he has only been tatting a year or less, he is already challenging himself to tat one of Renulek's napkins with size 80 thread. He has accomplished more in that one year than I accomplished in my first several. Scott and I plan to do this again, and we would love to find other tatters in our area who would like to join us. So if you are interested or know someone else in our area who might be, please reach out to me through this blog. Tatting together is such fun!

Wednesday, April 27, 2016

WIP Wednesday

I haven't made a lot of progress on my tatting projects this week. In fact, this evening provided the first opportunity to sit down and indulge for more than a few knots at a time. I felt some pressure to get round 4 of the Renulek 2016 Spring doily done so I made that my first priority.
WIP Wednesday tatting just wouldn't feel fully satisfying without some progress on my Spring 2014 Renulek doily, too. So one more repeat is done in the next to last round. It's not much, but I feel good about moving forward in even this small way. 

Now I'm off to bed. Time to rest to prepare for another beautiful day.

Happy tatting!

Monday, April 25, 2016

Playing with Ninetta's Curled Rings

Oh no, the Online Tatting Class is about to cover Ninetta's alternate methods of curling rings, and I hadn't learned to make the original ones yet! So I struggled to find some empty shuttles. Where are the dozens of shuttles I've bought over the years? I certainly don't have enough tied up in UFOs to account for all of them. I think there may be something to Madtatter80's talk of tatting pixies. They snatch shuttles, too. (See the comments under Fox's post here.)

I found some empty Aero bobbins, so I 'borrowed' the shuttle from my 2014 Renulek Doily (the WIP Wednesday project). I had recently emptied a shuttle after the last snowflake, so I was ready to begin. I read the class material for the upcoming lesson and started Ninetta's Little Pendant with Curled Rings. Only one of my three efforts was consigned to the trash. However, I'm not sure I can boast much since it was my third effort. Aren't we supposed to get better with practice? The one on the right was my first effort. The one of the left was second. Sensing it must be time for a tatting break, I decided to blog about my efforts and play again some other time.
Motifs #16 and #17 for 25 Motif Challenge
Both: Variegated Manuela Size 20 (shades of blue and green with a little white and pink--# unknown)
Left: Lizbeth Size 20 Color #628 Medium Salmon
Right: Cecelia Size 20 Color #818 Baby Pink
Beads - soft pink

I had fun. In fact, it occurred to me that it would be cute to attach three of these side by side for a larger necklace pendant. I'd like to give that a try when I play with it again.