Showing posts with label Renulek WIOSNA 2016. Show all posts

Friday, February 1, 2019

Another round on Renulek WIOSNA2016


I realize that what stalled me on this project back in 2016 was my constant rethinking of which color to use next and in future rounds. I’m trying to limit stressing about how to end it and concentrate on the current round.

Happy tatting!

Tuesday, January 1, 2019

Happy New Year

I hope all of my tatting friends are continuing to find joy in making their knots. I got some work done on my UFOs in the last few months of the year. I need to do some blocking before they are ready to be seen.

I tatted Wanda Salman's Morgan Mouse for my Christmas tree thinking the children would enjoy looking for it each time they came over during the holidays. The 3-year old thought of it every time she came.
size 20, Manuela thread from my stash

Jingle Bell Snowflake (from Tatted Snowflakes by Vida Sunderman, published by Dover) was my ornament gift to others this year. I use size 20 thread to tat more than a dozen of them. My oldest daughter also received a large doily, tatted in Lizbeth size 20. I used Renulek's Wiosna 2016, omitting round 17. The pattern is available through Renulek's blog or her Etsy shop. It's finished diameter is 22 inches. I've discovered it's very important to check to see if you actually have a picture when using my new iPhone XR. If I move from the photographed object too quickly, I don't get a photo. Of course, I didn't realize what had happened until I started looking for the image for this post and all of the tatting has moved on to new homes. I apologize for the lack of pictures.

I finished the year by working on some new Grandmommy/Granddaughter aprons.  It's time for the 3-year old to move from our toddler bibs to an apron when we are cooking together. This is the first of them. I chose to do only one in her size until she could try it on. It will work, but I'll modify the design for a larger fit at the neckline before cutting out the next two.

Happy tatting, everyone, and may your new year be full of blessings.

Tuesday, October 11, 2016

Wiggly Flowers, Butterfly Liberated, and Wiosna 2016 update

Wiggly Flowers by muskaan
Motifs #22, #23, and #24 in 2nd 25 Motif Challenge of 2016
Pink variegated (size 10 Manuela), Other variegated (size 20 Lizbeth)

After my last few posts, you were probably wondering if I was ever going to finish tatting something. :) Well, I did! And they were all quick, easy, and fun.

I'm always looking for great patterns for emptying my shuttles after a project is finished, and I tend to prefer ring only ones. Wiggly Flowers and Butterfly Liberated are both great for this and muskaan has shared them first as part of This Way or Tat? Set 1 - Rings Only, but she will be adding the patterns individually to her pattern page.

Wiggly Flowers is a great variation of the daisy diagram on page 9 of the pdf (1.A.iii.) as it uses half-closed rings. I love using beads in the opening of half-closed rings, so, after tatting a bead-less one to get the size, I searched through my bead stash for something the right size and a suitable color for a flower center.

Butterfly Liberated by muskaan
Motif #25 of 2nd 25 Motif Challenge of 2016
Same size 20 Lizbeth variegated thread as Wiggly Flowers

This little flutterer is also a variation of diagram I.A.iii on page 9, but with "a twist" as muskaan puts it. I tatted this with all traditional double stitches, including the little half-closed ring that is tucked in between the outward facing rings. While I've made loads of those 4-ring butterflies where the ends become the antennae, I find myself thinking every time that the butterfly needs a body! That little 4-ring design is just 2 wings (4 wing segments) and antennae. I like to think the knot I tie is the head. :) Now my ring-only butterflies can have a body. Thank you, muskaan.  (Tat it for yourself and notice the flow of the work. Did you find it to match that diagram, too?)

Progress update: Serwetka Wiosna 2016 by Renata Renulek Niemczyk
size 80 (DMC & Lizbeth)

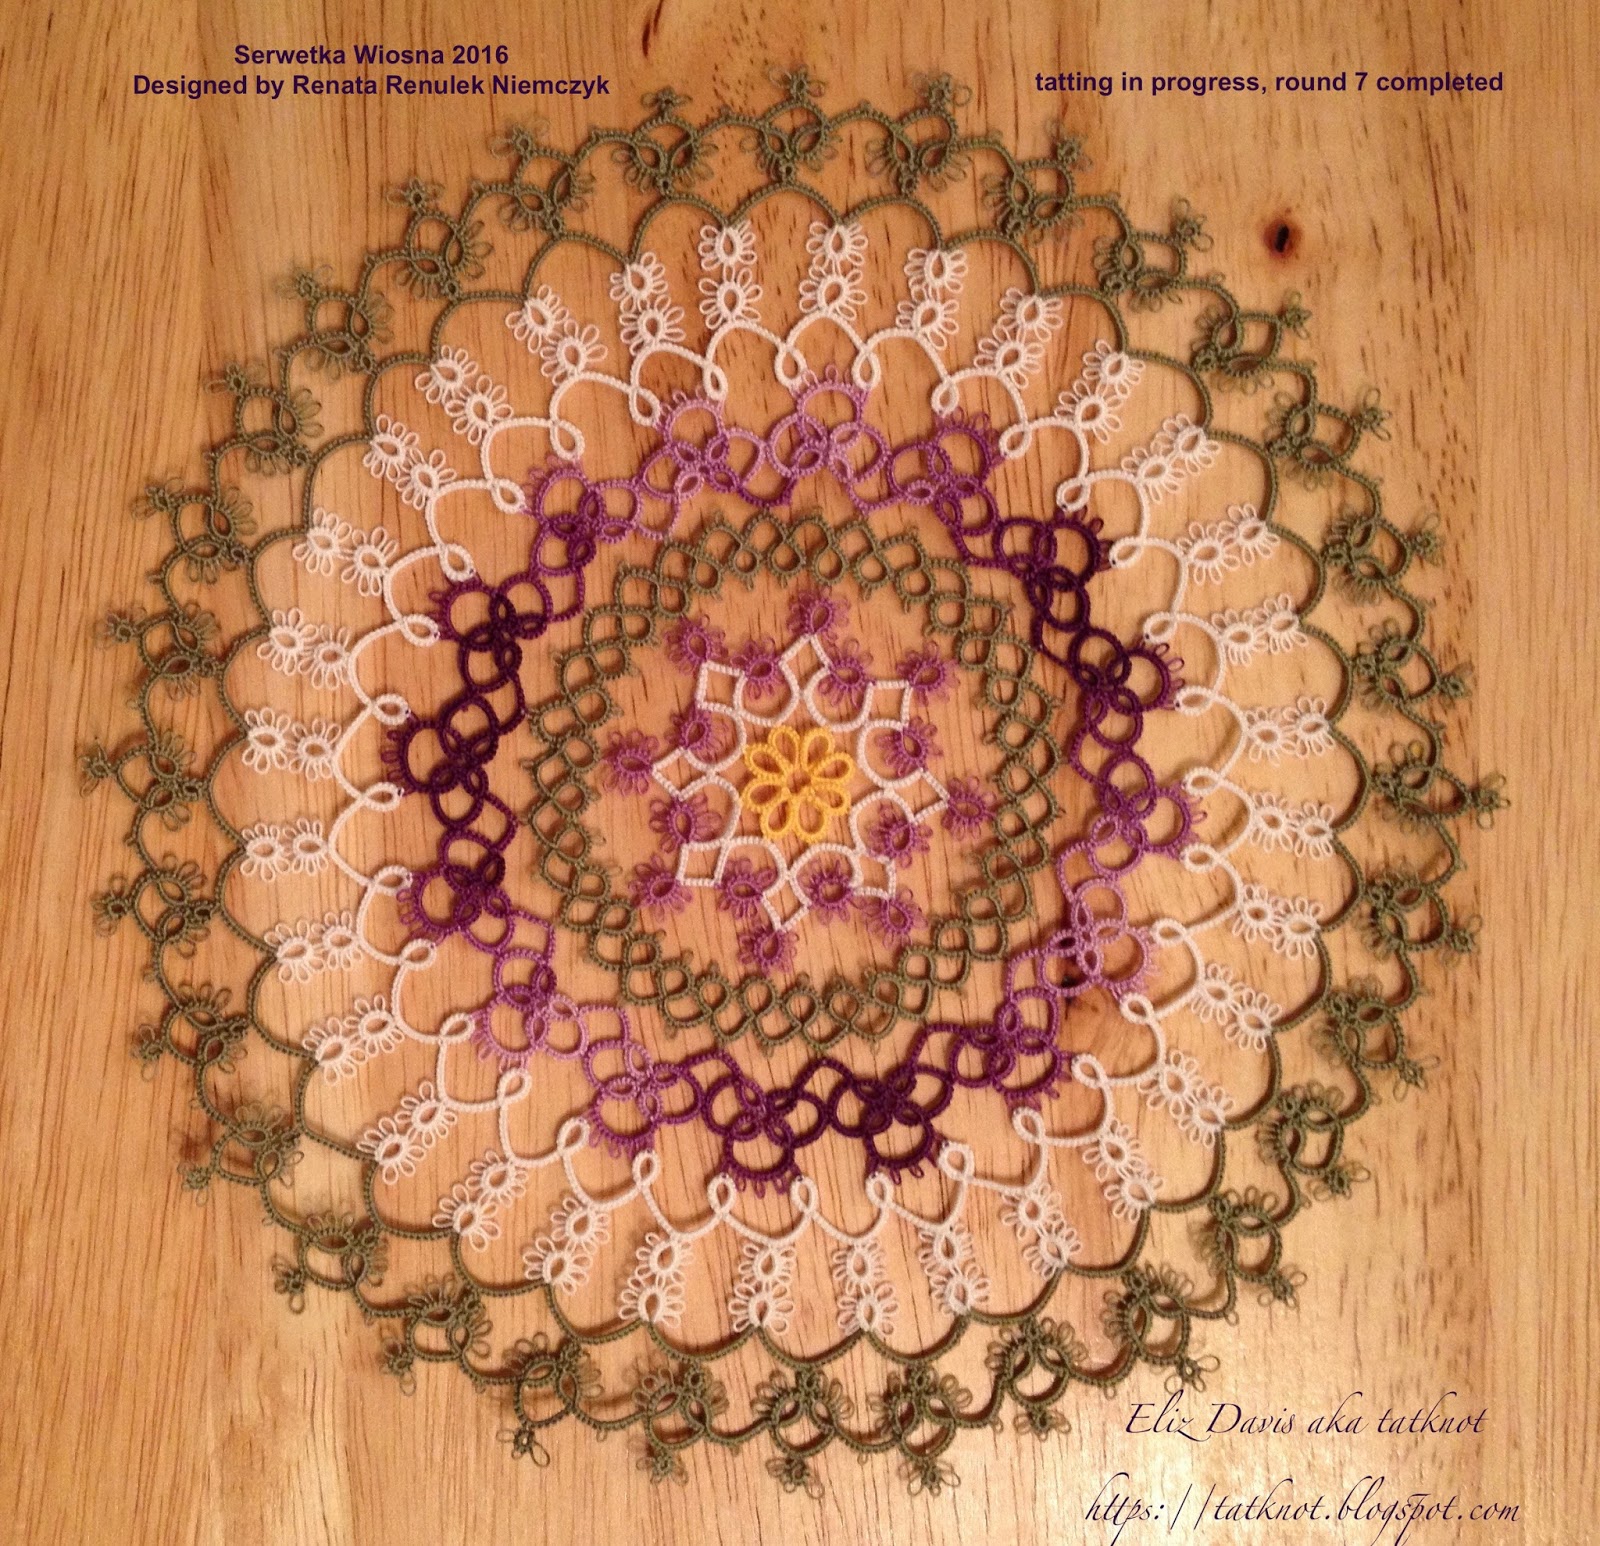
I'm finally back at work on this project and enjoying it. I'm working round 10 with yellow on shuttle 1 to form the inner-joining rings and white on shuttle 2 for the chains and thrown rings. All of my tatting on this doily has been traditional double stitches, but I do have a definite front side in mind. I've deliberately tatted each round so that the yellow rings and multiple picot rings that I view as flowers (like those in that first purple and white round) are all facing the same side up. This is how you are seeing it in the image above and how I plan to display it. Since this round has more of my little yellow flowers, I wanted those yellow rings to be face up compared to all of the other yellow rings in the doily so far. When I reversed work after that first yellow ring, I found myself moving around the doily in a counter-clockwise direction as you can see. I've found some similarities to the ring-only diagrams that we covered in the online class last night, but I know muskaan is going to cover ring and chain combinations as well, so I'm going to save my thoughts until then. :)

Happy tatting, everyone!


Monday, June 27, 2016

Round 4 of the Test Tat is complete

Hi, everyone. I managed to tat round 4 of the test tat for Jessica of the Sander's Tea Cloth. It is currently 19.5 cm, or 7.75 inches, in diameter in size 40 DMC Cordonnet. I'm a little concerned about whether there is enough room to properly insert the next round of motifs between those of this round, but I'll give it a try.


The final round of the Concentric Rectangles doily is underway, but I made a change to the corners  so I'm going to keep you in suspense until I can post a picture of the whole.

I continue to purposely lag behind on the Renulek doily. My start of round 10 with purple rings and white chains really doesn't appeal to me so I plan to cut it off and begin again.

Thank you to all of you tatting blog writers. While my tatting has been limited to easy projects that can be picked up and put down often, I've been popping in to see what the rest of you are doing. It's inspiring to follow your progress.

Happy tatting!

Monday, June 20, 2016

A little tatting and a little blog reading

As you can see, I managed to add a round to Renulek's Spring doily, but I'm still way behind. I'm content with that, though, because it gives me room to better plan the colors.

I'm struggling to keep up with blog reading as I love seeing what the rest of you are doing, but it's a busy time of year here at home. I'm getting a little bit done now and then on the Concentric Rectangles Doily and the test tat for Jennifer by carting them around everywhere I go, but I'm just not getting much computer time. Keep the tatting and blogging going. Things will slow a bit starting next week, I think. Meanwhile, I'm enjoying time with my family.

Happy Tatting!

Wednesday, June 15, 2016

WIP Wednesday

While I haven't accomplished much tatting in the past week, I managed to be close to finishing a round in each of three of my projects. I made it my goal today to complete those unfinished rounds.
The Renulek tat-along doily is just over 20 cm in diameter at the end of round 8. I'm still behind by a few rounds, but I'm not going to worry about that. (Size 80)

The image on the top right is the tea cloth test tat I'm doing for Jessica. At this point I've completed round 3. The next round is several motifs with two rounds each. It is approximately 12 cm in diameter so far. (Size 40)

The bottom image is the Concentric Rectangles doily. Just two more rounds to go, although Edda says you can keep going to make it as big as you like. It is 15 cm by 22.5 cm thus far. (Size 20)

Saturday, June 4, 2016

Finished Row 7 of Spring 2016 Renulek Tat-along Doily

Row 7 of Renulek's tat-along doily is now complete all in green. If you want to join the fun, the pattern starts here in her blog.
19 cm in diameter in DMC size 80

I think some of you will appreciate the use to which I put that failed effort at making a supersize Spinning Wheel Mat. After cutting the glass beads out, I gave it to Butterbean. She looks like she is pretending to tat it with her Tatsy shuttle, but who knows. She doesn't have enough language skill yet to tell me. :) Please forgive the slightly blurred photo. She was very busy.

Saturday, May 14, 2016

Round 7 Experiments (Renulek Spring 2016 WIOSNA)

Even the Prismacolor pencils failed me in planning the colors for round 7. Maybe part of the problem was that I didn't particularly favor or dislike any of the options I tried. I started out using purple and yellow, but I really didn't like it. It's a simple round that will be quick to tat, so I decided to experiment with the actual threads.

Having just downloaded CollageITfree to my Mac, I put the images side by side to help me make up my mind.

Viewed this way, the last two appeal to me the most. I'm going with the yellow and green, though. I like the brightness it brings to the doily at this point. So now it's time to cut all of these experiments off, reload the shuttle, and start again.

UPDATE: So after all of that, I've decided to wait until I see the next round before doing anything at all about this one. Now that you've had a glimpse into how my mind works, you probably wonder how I manage to get anything done.

Sunday, May 8, 2016

Round 6 of Renulek Spring 2016 doily

I pulled out my Prismacolor pencils and tried out a few combinations before starting to tat. Here is the result.

Saturday, April 30, 2016

Doily Progress and a New Tatting Buddy

Deciding upon the color of the next round of the Renulek Spring 2016 WIOSNA doily really wasn't as difficult for me as the first few decisions. I went with all white for this one. The tatting progressed rapidly, too.

While I'm pleased to have made such progress on this doily today, the real highlight of my weekend was meeting and tatting with Scott. Scott found me through the Craftree forum and reached out wondering if I would like to meet. Would I ever! So we met at Barnes & Noble in North Little Rock today, and I was amazed to discover as we left that we had spent three hours sharing our tatting. The time had just flown by! Scott taught himself to tat with the help of YouTube videos. While he has only been tatting a year or less, he is already challenging himself to tat one of Renulek's napkins with size 80 thread. He has accomplished more in that one year than I accomplished in my first several. Scott and I plan to do this again, and we would love to find other tatters in our area who would like to join us. So if you are interested or know someone else in our area who might be, please reach out to me through this blog. Tatting together is such fun!

Wednesday, April 27, 2016

WIP Wednesday

I haven't made a lot of progress on my tatting projects this week. In fact, this evening provided the first opportunity to sit down and indulge for more than a few knots at a time. I felt some pressure to get round 4 of the Renulek 2016 Spring doily done so I made that my first priority.
WIP Wednesday tatting just wouldn't feel fully satisfying without some progress on my Spring 2014 Renulek doily, too. So one more repeat is done in the next to last round. It's not much, but I feel good about moving forward in even this small way. 

Now I'm off to bed. Time to rest to prepare for another beautiful day.

Happy tatting!

Sunday, April 24, 2016

Renulek Spring 2016 WIOSNA Update and Practicing Techniques

It is coming together nicely so far, I think. When I joined to the wrong picot of with the variegated purple, I decided it was time to take a break. I cut out part of work and untatted until I was at a good spot to start fresh next time.
All threads are size 80
DMC #743 (Yellow - MED)
 DMC #3052 (Green Gray - MED), Lizbeth #601 (White)
DMC #52 (Variegated Violet)

My goal as I tat these days is to take the time to try new techniques or to practice techniques I have not yet mastered. I practiced Jane Eborall's Joining with no blips! on the first three joins in the green round. Then I lost my concentration and joined normally. The blipless join does not produce quite as smooth a join as my traditional method and the blip was so hard to see in these colors and this size thread that I decided to give it up for this project as long as I'm joining the purples to the green.

Another opportunity for practice came with the latest round. I've chosen to work with ball and shuttle. When I reached the first place for a second shuttle chain, I tried Lene Bjorn's technique for changing shuttle positions as described in 24 Snowflakes in Tatting for her block tatting. I did an unflipped first half followed by a normal second half and counted it as the first double stitch. The next chain was done by tatting unflipped double stitches in the same half stitch order that I usually use for the second half of a split ring. The third chain was tatted with unflipped double stitches with the half stitches reversed. It was my favorite of the three, but, unfortunately, you can't see it at the moment. I was so busy concentrating on my experiments that I joined to the wrong picot of the previous round. So that's where I shall start with my next session on this project. By the way, I found Lene's method of changing the shuttle location very convenient and, at least in size 80 thread, it looked fine. I definitely prefer her method over the Shoelace Trick.

A third practice area for me with this doily has been the job of hiding ends. After having some ends pull out when using the Magic Thread Trick in some previous projects, I had decided to go back to sewing in the ends. However, I find that this really effects the look of the rings and chains in size 80 thread. Perhaps that is because it is so hard to carefully place the thread as I work it into the double stitches, but I'm not happy with it. I sewed the ends in on the yellow center and on the white and purple round. So with the green round I decided to use the magic thread trick, but sewed a couple of stitches back the way the ends had come to lock them into place. It still isn't a perfect solution, but I like it the best of what I've tried so far for these small threads.

Monday, April 18, 2016

Coloring the Renulek WIOSNA 2016 Doily

I'm somewhat of a coward when it comes to planning for color, but we've got some tatters in our midst who have a fantastic gift for it. They inspire me to want to be bolder in my use of color, but my bold is still rather tame by comparison. All of this leads me to share my approach to selecting colors for Renulek's latest tat-along doily. I printed several copies of the image through round 3, grabbed my colored pencils in the colors I was most interested in trying, and tested some of the different combos. My selections were also limited by the fact that I'm determined to work from my stash. I am going to need more white size 80, but that's a justifiable purchase, as you have to have plenty of white in any thread collection. Right?
I have more colors available in the size 80. That's a lavender color rather than a pink, by the way. I'm going to start with the size 80. If the final product is too small for the location I have in mind for it, I can always start again with the size 30 also featured in the picture. The only green I have in the larger size is a size 50 Altin Basak, but it tats up very similar in size to the size 30 I have.

I'm starting with a golden yellow center. It just so happens that I still have some thread of that color loaded on my shuttle. If I don't get anything else done tonight, I want to get that center tatted.