Showing posts with label 24 Snowflakes in Tatting. Show all posts

Thursday, January 19, 2017

The Old and the New

It's been ages, too, since I've posted on my blog so I thought I'd update you with the last of the old and the start of the new. 
The OLD: I promised you more pictures of the burlap ornaments I made using the snowflakes I tatted from 24 Snowflakes in Tatting by Lene Bjorn. While you can't see all of them plainly in this picture, you've seen all of the snowflakes before if you followed my blog last year. There were seven ornaments in all and my daughter loved each one. If you'd like more details about how I made the ornaments, please see my December post.
The NEW: I didn't get any tatting done for several weeks which actually left me struggling to find the motivation to pick up my shuttles again. I'm sure it was partly the winter blahs and partly that it is a very busy time of year for me so that finding time to tat is a real challenge. However, Jane Eborall's TIAS 2017 is perfect for getting back in the groove. I've enjoyed the switch to tatting with Lizbeth Jelly Bean after so many white snowflakes, too. Still no clue, though, as to what we are tatting, but that's a big part of the fun. It isn't too late to pick up your shuttles or tatting needles and join the fun.

I was rocking along quite well with the Craftree Snowflake challenge last year until November. I finished the year with both the Nineteenth of December and the Twentieth of December in progress. The challenge was lots of fun and I'm committed to finishing the remaining snowflakes in this book as well as the Renulek doily I started last year. Then there are all of the great ideas that keep popping up in your blogs! Obviously, I have plenty to tat in 2017.

Til later,
Eliz aka Tatknot

Thursday, December 8, 2016

Tatting and Burlap Christmas Ornaments

I apologize for my extended absence. It's a busy season at work as well as at home. In my free time, I've been working on Christmas presents. I thought you'd like to see what I'm doing with some of the snowflakes I've tatted from Lene Bjorn's 24 Snowflakes in Tatting.


These are the first two of a set of six ornaments I'm making for my oldest daughter. The finished ornaments are approximately 5 inches in diameter. They were trickier to make than I expected. It took four test ornaments before I figured out what was going to work. The method I settled upon required the attachment of a cotton lining to each circle of burlap using a buttonhole stitch before the two circles were sewn together, turned inside out, and stuffed. I found this to be the best way to stabilize the burlap so that the seams didn't tear out when they were turned to the inside.

I finished attaching the lace to all of the ornaments this evening. All that is left is to attach the remaining ribbons. I'll post pictures of the other four next time. 

If you would like to review my original posts about the tatting, you'll find them here:

Happy tatting!

Friday, November 11, 2016

Tatting Awards, Please Vote! & 19th Day of December

Hello, everyone. I'm going to share some in-progress details about my latest Bjorn snowflake, but I also want to invite all of my blog readers to visit http://www.craftree.com/awards/current to vote in the Craftree 2016 Tatting Awards. You don't have to be a tatter or a member of the Craftree forum to vote. Just enjoy the links to the various works and select your favorites.

19th Day of December
from 24 Snowflakes in Tatting by Lene Bjorn
working #19 of 24 in this Craftree Challenge
DMC size 30


I really wanted to share the center of this snowflake with you. In Lene's diagram, the rings, split rings, and mock rings are numbered to progress in a counterclockwise direction. However, if you move from split ring #3 to mock ring ring #4-6, you are going to turn #3 around. The result is that you are going to have rings, SRs, and mock rings that face in different directions. By choosing to tat the center in a clockwise direction instead, all rings, split rings, and mock rings that form the center will be face up because there is no need to do any turns or reverses. (Thank you, muskaan for the TWoT exercises that helped me spot the advantages of making a different choice here.)

I'm not very happy with the appearance of the final split ring in the center. My SR is more rounded at its start than Lene's (see the arm on which I've begun the next round). As I look at the picture in the book, I don't see a gap at the center between #3 and #16 making me wonder if Lene joined to #3 before she began tatting #16. I'm hoping that blocking when it is done will help to make this gap less noticeable, but if I tat it again, I'm going to try joining to the base of #3 before I begin the final split ring to start the climb up to the next round.

Saturday, October 29, 2016

Pattern Search & Thirteenth Day of December

Tatting Pattern Search - Help Needed!

Hello, my friends. I'm hoping you can help me. In my early days of tatting in the 1990s, I had an edging pattern that featured separately tatted berries (raspberries?). I used it as the idea behind a bookmark I tatted for an exchange, placing one berry on the end of the green bookmarks tail as a sort of charm. I can't even remember who received the bookmark in the exchange. It was tatted with Finca size 16 perle cotton. Does anyone remember ever seeing such a pattern? I'm thinking it was in a magazine, possibly Workbasket, but I haven't found it yet in my stash of magazine patterns.

The Thirteenth Day of December - Thank you, Rachael Mohler!

The Thirteenth Day of December
from 24 Snowflakes in Tatting by Lene Bjorn
Manuela size 20
Motif #4 in 3rd 25 Motif Challenge of 2016

I skipped over this snowflake as I was working on the Craftree challenge to tat all of the snowflakes from this book before the year is out. Every one of those chain rounds requires a split chain and I haven't been able to remember how to do it. It seems that remembering seldom used modern tatting techniques is not like riding a bicycle. When I learned it the first time, I was following email instructions (without illustrations) that I received from David Collyer. There are now several wonderful resources out there for learning this technique, but I learned from my own experience in trying to relearn it that you should not give up after using one or even many recommended resources. You just have to find the one that finally causes what you saw in all of the others to click into place. For me, it was the video instructions for tatting the single shuttle split ring in Rachael Mohler's Hen N Chick Square. Thank you, Rachael!

My tatting of this wonderful floral snowflake is not without mistakes. I was so focused on the split chains that I failed to follow the stitch counts properly for the outer round, but the chains are long enough that it still has a nice look to it. 

TWoT notes: I tatted this snowflake using traditional tatting. When I reversed work after the central ring, I started tatting the design from the back so progression was in a counterclockwise direction. However, each split chain segment moves in the opposite direction so there is a small segment of chain in each of the inner chain rounds that moved clockwise again before I started the next chain round. 

Woo Hoo! I can be a bit obsessive sometimes and I hated skipping a number. :) Now I can move forward again with confidence that the next split chain is not going to trip me up.

Happy Tatting!

Friday, August 26, 2016

The Eighteenth Day of December

Motif #17 of 2nd 25 Motif Challenge of 2016
The Eighteenth Day of December 
from 24 Snowflakes in Tatting by Lene Bjorn
Manuela size 10
Measure 13.5 cm (5.25 inches) in diameter 

I tatted this with a front and a back (directional tatting) which means some rings had to be tatted with reverse order double stitches. Then I took a picture of the back side instead of the front. Will you believe me if I tell you that I did that purposely to show you that it looks good from that side, too? (Made you smile!) Of course I didn't, but I learned something from my mistake. 

Directional tatting is a very useful tool, but I rarely bother with front side/back side, because in most of the things I tat, I like that there is no front or back. This time, I felt that, since the pattern is composed entirely of rings, a mix of front and back side rings might be more obvious and less pleasing to my eye. I'm glad I bothered because no matter which side lands up, the look throughout the piece is consistent. It was worth the effort.

Lene provides little arrows in each ring of the diagram to indicate whether a ring is split or traditional. The direction of the arrows in rings 1 and 2, both traditional rings, seemed to me to be reversed. Muskaan mentioned in past post of hers that she sometimes finds that she tats in a different direction than the pattern, and that may be the case here. As I studied the pattern, I also realized that there could be an alternative start to the pattern. I opted to tat ring 2 followed by ring 1, and then proceeded as Lene designed it. 

I really enjoyed this pattern and will definitely use it again. I'm going to use this one as a coaster and it needs some companions. 

Happy tatting!

Tuesday, July 26, 2016

17th Day of December Snowflake

The Seventeenth Day of December 
from Lene Bjorn's 24 Snowflakes in Tatting
DMC Cecelia size 30
Finished diameter 9 cm or 3.6 inches
Motif #11 for 2nd 25 Motif Challenge of 2016

By starting with a clover from the outside round and making the 2nd ring of the clover a self-closing mock ring, I was able to tat this in one round. I left a mock picot between the inside rings and the mock rings to give the illusion of a separate round as in the original. 

This, too, is one of the items I tatted while my computer was down last week. 

Monday, July 25, 2016

16th Day of December Snowflake

The Sixteenth Day of December 
from Lene Bjorn's 24 Snowflakes in Tatting
Lizbeth size 20
Finished diameter 9.5 cm or 3.75 inches
Motif #10 for 2nd 25 Motif Challenge of 2016

If you look closely, you can see I still struggled a bit with the tension of those long chains, but I'm content with it for now. 

This is another of the items I finished while my computer was down last week. Unfortunately, the wifi issue has returned. I'm online now with a cable stretching from the router and across 2 rooms, but that has to be taken down when the little ones are here. 

Happy tatting!

Sunday, July 10, 2016

Snowflakes completed for June and July (Motifs 4, 5, & 6 for 25 Motif Challenge)

My plan was two a month and I got behind by two in June. Now I'm caught up through July. (Join us in the Craftree tatting forum as we tat Lene Bjorn's 24 Snowflakes in Tatting before the year ends.) You'll notice that I skipped a flake this time. I will come back to it later when I have time to practice that frustrating split chain some more. :)
Twelfth Day of December 
White, Size 30 DMC, approx. 10cm in diameter
It isn't missing a chain. I didn't notice that one of the chains had folded over behind the ring when I took the photograph. I really like this one.

Fourteenth Day of December
White, Size 30 DMC, approx. 10cm in diameter
I like the way this one looks, but it isn't without mistakes. The small chains in that outer round that are side by side are not identical, at least they aren't supposed to be. I made a mistake with the very first pair and didn't notice until a couple of repeats later. I didn't cut it out, but, determined not to have any more of those mistakes in the piece, I found myself untatting several times. 

Fifteenth Day of December
White, Size 30 DMC, approx. 10cm in diameter
This one is a mess. It looked like a bowl as I finished the tatting.  My rings should have had larger picots. I struggled to keep those chains looking smooth, but I also was running short of thread on my shuttles as I neared the end. I was tatting with the bobbins and changing shuttles to avoid having to add in new thread so close to the end. Can you see where I did the shoelace trick in that top left chain? Note the breaks in the curve. The ends of this one had to be knotted and cut as one of them was less than an inch long. That was close! I hope my own failure with this one won't keep others from trying it. I think the design is a lovely one. Just remember to use the picture as a guide to picot size. Most of them must be fairly long.

The children and grandchildren were all out of town yesterday so I found some time to work on learning something new. I'll be sharing more about my explorations later. 

Happy tatting!


Wednesday, July 6, 2016

Eleventh Day of December

I'm just now catching up on my goal for the Craftree Challenge of tatting all 24 snowflakes from Lene Bjorn's 24 Snowflakes in Tatting this year. My personal goal has been two snowflakes a month, and I didn't tat any of them in June. I've been needing simple projects for my tatting time lately, and the Eleventh and Twelfth of December qualify.
Motif #3 for 2nd 25 Motif Challenge of 2016
DMC Cebelia size 30 in white
just over 8 cm in diameter
I decreased the size of the picots.


Thursday, May 12, 2016

Tenth of December

Motif #20 for 25 Motif Challenge
The Tenth Day of December
from 24 Snowflakes in Tatting by Lene Bjorn
DMC Size 80, Color #67 (Variegated Baby Blue)
Finished size 6.5 cm

This one tatted up quickly. To keep on target for the Craftree challenge, my goal has been to complete two from this book each month. Having met my personal goal for May, I'll devote my tatting time to trying a few new things. I've printed Ninetta's butterfly pattern that uses the Ikuta picots so I can practice them a bit before I forget how to do them. I also saw that Renulek posted the next round of the Spring 2016 WIOSNA doily. I think I've settled on my colors for this round, but it was tough. I'm eager to get some more yellow into the doily, but the rounds haven't seemed right for it yet. If my first choice for colors doesn't seem to be working like I wish, I'll cut it off and go with my second choice which picks the yellow up again. I would still like to do another Morfo butterfly, too. 

Happy tatting!

Tuesday, May 10, 2016

Ninth Day of December instead of Morfo #2

With two mangled tattings of the Morfo back in my trashcan, I decided that it's time to tat something else for a change. Was it the thread I chose? Was I too tense and it was transferring to my tatting tension? Who knows! Solution: Tat something else for a while. 

So I've returned to the snowflakes I want to tat this month to keep up with the Craftree Challenge to tat all of the snowflakes in Lene Bjorn's 24 Snowflakes in Tatting by the end of the year. The Ninth Day of December contains lots of block tatting. I tatted the Eighth Day of December using Lene's instructions for block tatting with ball and shuttle. Being determined to give her instructions for block tatting with two shuttles a fair chance, I decided to use two colors for the Ninth. That way I couldn't change techniques mid-flake. Charity921 tatted an impressive Ninth Day of December in navy and white which really inspired me. Having started a collection of my own red and white snowflakes that I call candycane snowflakes, I opted for red and white.
Motif #19 for the 25 Motif Challenge
Manuela #052 (red) size 20 
Cecelia (white) size 20
Finished size: 10.5 cm

I love Lene's instructions for block tatting, but I have a definite preference for her ball and shuttle method. I don't think I'll use the two-shuttle method again unless I need it for color changes as in this one. The two-shuttle method is just so much slower. You never move the ball thread from your left hand in the ball and shuttle method. As you can imagine, that let me move along rather quickly. I will concede that the edges of the two-shuttle method are a little more 'finished' looking, but while this might be a consideration with a large thread, I don't think it would be noticeable in a small thread such as size 80.

Saturday, April 23, 2016

Bjorn 8th of December is Finished

This was a fun snowflake to tat. I really like Lene's ball and shuttle method for block tatting. The ball thread never has to change position in your hand. She recommends an unflipped 1st half stitch followed by a normal 2nd half stitch. It was very quick. This method could be used in place of the shoelace trick for changing shuttle position in any pattern.

Motif #15 for 25 Motif Challenge
Eighth of December from 24 Snowflakes in Tatting 
DMC Size 80, Color #67 (Variegated Baby Blue)

I was very conscientious in pulling the first double stitch of the chain up snugly against each clover in this final round. That turned out to be a mistake. It made the clovers want to angle so that the snowflake looked more like a pinwheel than a snowflake. It took some careful blocking of the wet flake to convince those clovers to sit at a more appropriate angle.

I'm definitely behind on the latest Renulek doily, but I hope to do some catching up today. It's been an extremely busy week, so I'm resting today with plans to do very little that isn't related to tatting. It took me a couple of hours this morning just to catch up with the reading of your blogs and the forum, but it has been a wonderfully lazy two hours.

Sunday, April 17, 2016

Weekend Tatting Report

Two snowflakes and most of a third are completed for the Craftree Tat-along of 24 Snowflakes in Tatting by Lene Bjorn before the year ends. I invite you to get a copy of the book and join in the fun.

I'm using Lene's snowflakes to practice some techniques I rarely use or haven't mastered yet. My split chains are still failures. I really wish I could find David's email instructions as it worked for me every time way back when. I shall persevere.
The Sixth Day of December
Motif #13 for the 25 Motif Challenge
Tatted in DMC size 80, it is just over 6 cm in diameter.
The Seventh Day of December 
Motif #14 for the 25 Motif Challenge
Also tatted in DMC size 80, it is 7.5 cm in diameter.


I started with a center ring so I could climb out with a split ring of 8/8 to tat the outer round. I practiced onion rings to form those layered circles.


Round 1 with the beginning of Round 2
The Eighth Day of December
Also in DMC size 80.
Lene provides instructions for block tatting with ball and shuttle as well as with two shuttles. Since the Eighth recommends ball and shuttle and the Ninth recommends two shuttles, I thought I'd enjoy trying both methods of block tatting to see if I prefer one method over the other. 

Thanks for dropping by my blog!

Monday, March 21, 2016

More Lene Bjorn Snowflakes and WIP progress

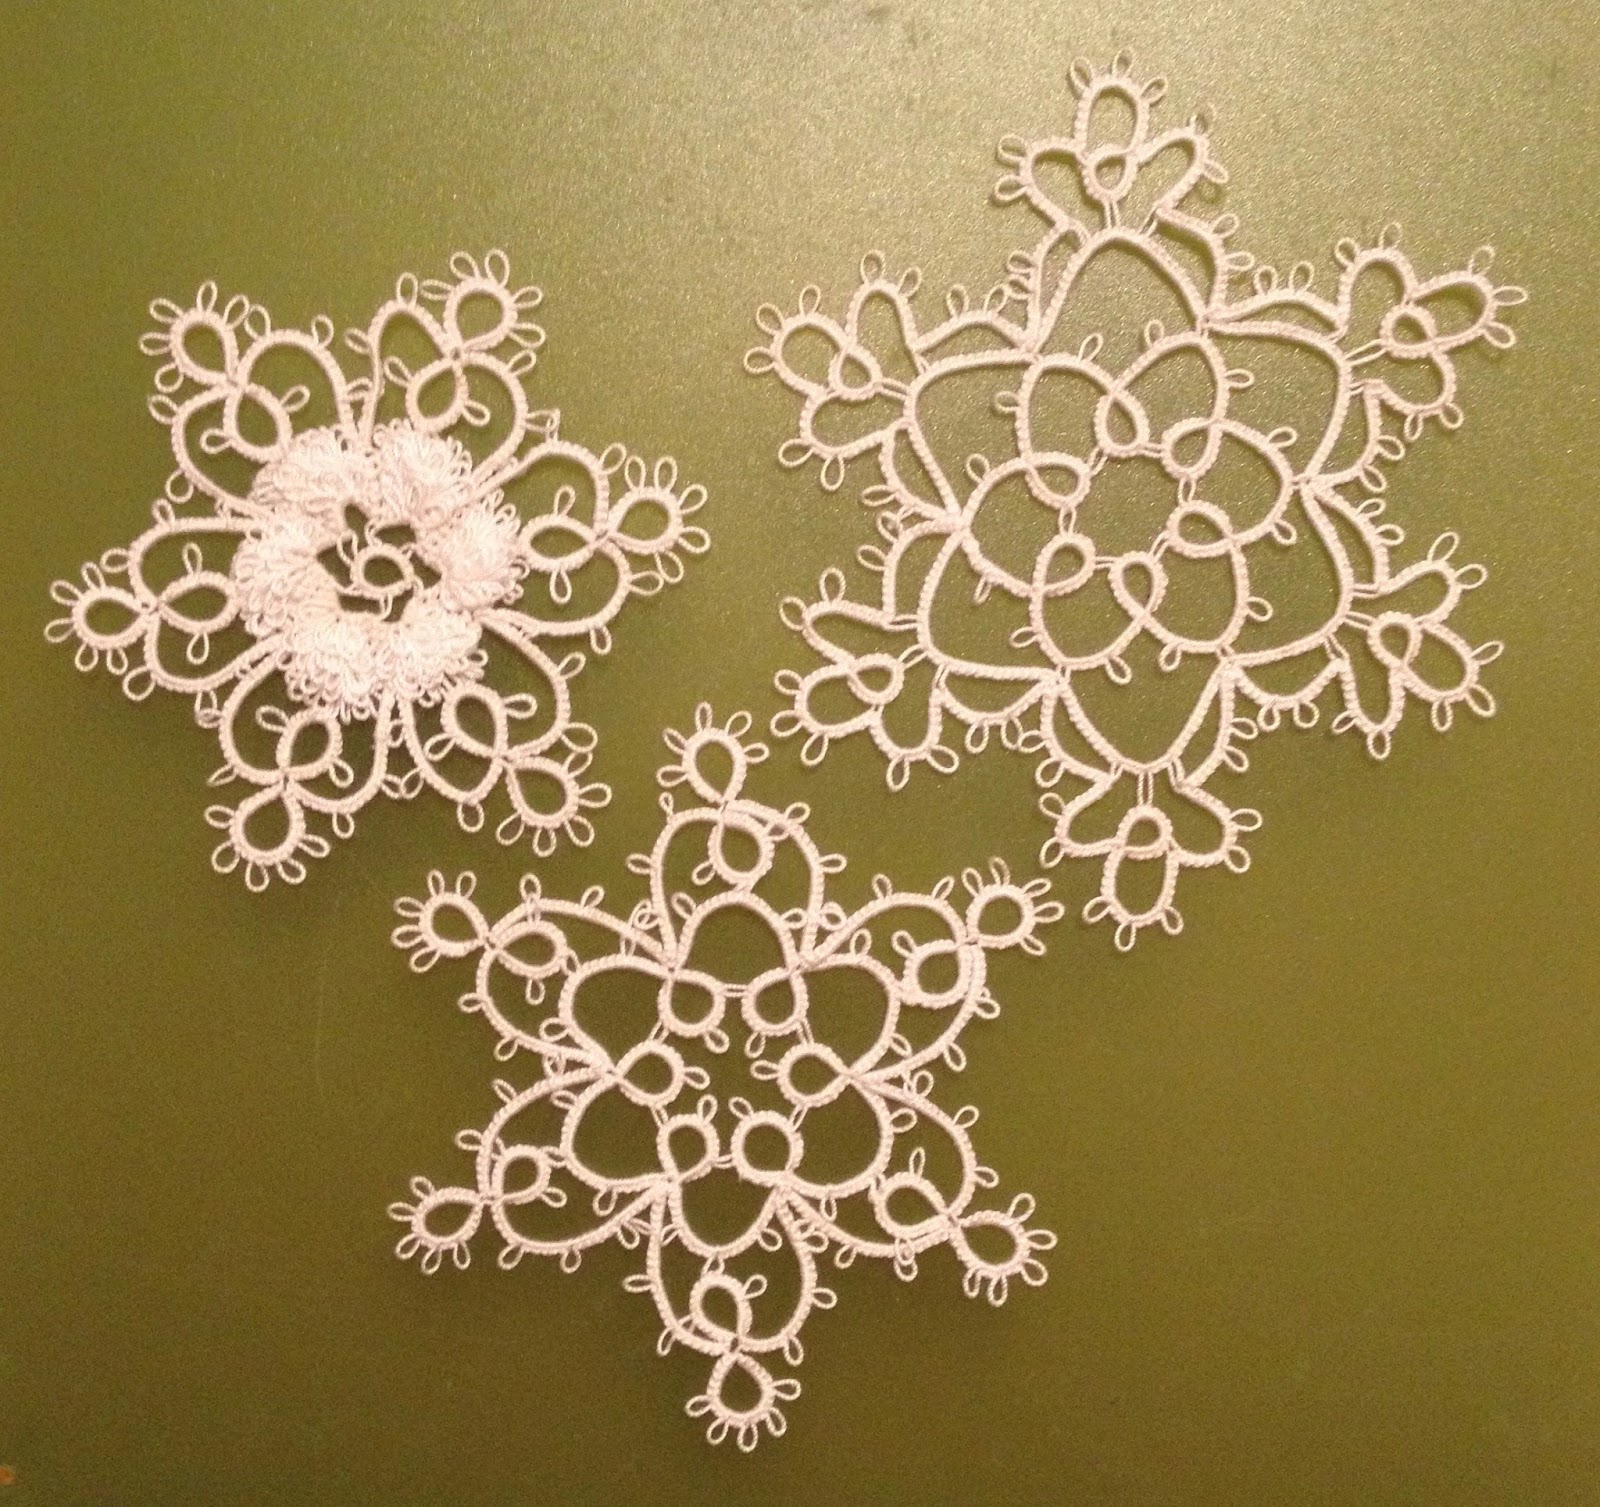
December 1 and 2 are done. I need to do a better job of blocking, but I plan to wash all of them before the final blocking. Join the Craftree challenge to tat all 24 snowflakes in 2016. I'm considering these to be motif #5 and #6 for the 25 Motif Challenge.
I'm starting over on the Norma Benporath Mystery Cake Doyley. While I love Finca size 16 perle cotton and it was looking wonderful, it was proving too fragile for me for this project. I'm beginning again with DMC size 80 in the closest color I have on hand.

Now I'm off to work on the crown this evening.

Happy tatting!

Thursday, March 10, 2016

4 motifs to start the 25 Motif Challenge

I seem to be in the mood for challenges lately. I've been battling severe asthma for over a month and now have bronchitis. Sitting and tatting is one of the few things I really feel like doing. It is restful and productive at the same time--a wonderful combination.

Sharon's 25 Motif Challenge is one of my favorite blogs to follow. It helps me find the blogs and webpages of other tatters. Of course, I want to follow all of you! It has been years since I participated  in the challenge myself, but this seemed like a great year to jump back in.


My first 3 motifs for the 25 Motif Challenge are also my first 3 motifs in the Craftree challenge to tat all of the snowflakes in Lene Bjorn's 24 Snowflakes in Tatting this year. I'm using white DMC Cecelia size 30. These are December 3, 4, and 5. Since the challenge started at the first of the year, most of the participants are working on December 5 or December 6. I decided to start with the #5 snowflake as that is the one I'd have been working on in the first half of March if I was on target. Then I started working backward to catch up as I have time. I'll get December 1 and 2 done as I get time, but I'll keep moving forward through the rest of the book on schedule. At least, that's the plan.

Lastly, I want to share another Ice Cream Cone as an example of working a mistake into the design. When I went to join the third ring of the outer round to the center square, I joined to the wrong picot. Rather than take out that ring, I just increased the number of rings and chains and made sure the 2nd side mirrored the first. Most likely only another tatter would notice that it differs from the original design. The pink thread is a Manuela size 20 I had on hand and the cone is more of the Altin Basak size 50.