
Showing posts with label Norma Benporath. Show all posts
Showing posts with label Norma Benporath. Show all posts
Saturday, April 16, 2016
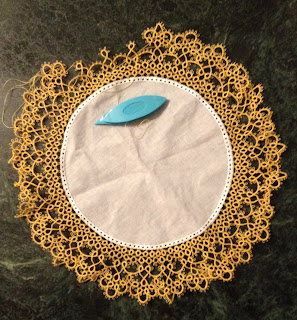
Benporath Cake Doyley Complete and Delivered
Many thanks to all of you who answered my call for feedback about adding the center medallion to Norma's Cake Doyley. With a fair amount of trepidation, I decided to add the center medallion. It's done and delivered, and Mom was thrilled with it.
 Norma suggested using the buttonhole stitch to sew around the motif, catching the outer picots as you sew. The first thing I had to do was an internet search for instructions on the buttonhole stitch. For a first effort, it came out pretty well. I was really nervous about cutting the fabric away behind the lace, but so glad I did once I saw the difference it makes. Laying the lace atop the fabric circle really didn't give me a clear idea of what it would look like once the fabric behind it was removed.


Friday, April 15, 2016
Insert or No Insert
I'm excited to report that the tatting of the Norma Benporath Mystery Cake Doyley is complete. I'm seriously torn about whether to add the motif to the center. Norma provides enough instruction in the pattern that I think I could create the cutout behind the center medallion. Two things make me reluctant to finish it as Norma intended. Firstly, Mom will not use it as a cake doily and may be reluctant to sit anything on it that might hide the center medallion. Secondly, I'm concerned that I chose such a small fabric circle that the motif is a bit too large by comparison. So I'm asking you for your input. I confess, though, that there is a part of me that wants to see it through so that it is a good reproduction of what Norma tatted for her original pattern.


Motif #12 for the 25 Motif Challenge
Thursday, April 14, 2016
Very Little Progress
In the last five days, I've managed to complete only two more scallops on the Benporath Mystery Cake Doyley. Three more to go.

Thursday, April 7, 2016
Just 5.5 repeats left!
I found myself with more time to tat today than usual, so I made good progress on the doily. I have just 5.5 repeats left. It's finished diameter is about 9.5 inches. I'm very close to the end of this ball of thread. I have another, but I didn't expect to need it. I really like this bright, sunshiny yellow. It is so cheerful.
 I had actually planned to do this outer round in white, but I reloaded my shuttle and started the round without thinking. Now I'm glad I forgot the plan.
I don't expect to have much time, if any, to tat tomorrow, so it will be the weekend before I finally finish this round. I still have a center motif to tat. Once it's tatted, I'll decide whether or not to attach it. It looks rather lovely without it. I will post a picture of it with and without the center and you can tell me what you think.
If you remember, I originally started this project by tatting the center motif first using Finca size 16 perle cotton. I've got an idea for finishing it into a larger motif that keeps with the theme of the doily. If I don't use the DMC center on the doily (and I like the enlarged perle cotton motif), I may complete the DMC center the same way. Thinking and planning is half the fun.

I don't expect to have much time, if any, to tat tomorrow, so it will be the weekend before I finally finish this round. I still have a center motif to tat. Once it's tatted, I'll decide whether or not to attach it. It looks rather lovely without it. I will post a picture of it with and without the center and you can tell me what you think.
If you remember, I originally started this project by tatting the center motif first using Finca size 16 perle cotton. I've got an idea for finishing it into a larger motif that keeps with the theme of the doily. If I don't use the DMC center on the doily (and I like the enlarged perle cotton motif), I may complete the DMC center the same way. Thinking and planning is half the fun.
Tuesday, April 5, 2016
Started the Final Round

Norma didn't write reverse works into her instructions. If you make the unattached rings on round 2 as second shuttle rings, the chains will arch rather than form the sharper point of my chains. I made the round with one shuttle and a ball thread so that the unattached rings want to face the same way as the other rings. I then folded the rings outward to form that sharp angle to the chains.
Both the first Benporath Mystery project we did and this one contain instructions to join into one picot immediately followed by instructions to join into another picot. If you assume it to be a mistake, you must add what you believe to be the missing stitches between the joins. If you assume it is intentional, you must decide how to make the joins. This was what first motivated my explorations into joins to 2 picots. I chose to believe it to be intentional, and I'm using the down picot joins (the last in my practice sample). It is in this last round where the single ring joins to the two middle picots of the 4-picot chain segment (between the scallops).
This pattern also has a motif for the center of the fabric. The fabric would normally be cutout behind the motif. I will tat it again in this thread, but I haven't decided whether I will sew it to the doily. I know I won't cut the fabric out behind it.
The thread I'm using is DMC size 80, color 743. I'm really enjoying tatting this edging.
Sunday, April 3, 2016
Weekend Tatting
I made some progress on the Norma Benporath Mystery Cake Doyley. I attached the first round to the fabric before starting round 2. The fabric gets quite wrinkled as I work, but it will all be pressed nicely later.

I also had the opportunity today to test a tutorial by Tamara for creating tatting shuttles from business cards or cardboard of similar weight. She has posted the tutorial, but please note that she is still editing it. Tamara has limited access to tatting supplies in the Dominican Republic, so she developed this idea to meet the need for some shuttles for a workshop she plans to teach. These use supplies she had readily available at home. I used the same materials and I am very impressed with her shuttles. I made one of each of the two designs and tatted a centipede with each shuttle using size 10 Manuela threads. which is the thread size I usually use when teaching. The pattern is by Lisbeth Johansson and I found it in 2003 at http://www.frivolitesknuten.com but that link is no longer working.


These little centipedes are #9 and #10 for the 25 Motif Challenge, too.
Wednesday, March 30, 2016
Joining to 2 picots at one location
The Dorothy Edging that I designed for my mother for Christmas requires you to join to a picot from two chains at one location. As a result of some confusion about how Norma Benporath intended for us to make a similar join in a round that was part of the Norma Benporath Mystery Border, I started to explore different ways this might be done. I settled on making those joins by joining to each picot separately without completing a half stitch between rather than joining by pulling the thread up through both picots at the same time. It produced a different look. Since then I've tried up joins and down joins in various combinations as well. Click HERE to see the results of my explorations. This was not an attempt to explore all of the ways this could be done, but to explore the effects of some of the different ways of which I am currently aware.

I plan to celebrate International Tatting Day (April 1) by sharing another free pattern with you. I hope you'll drop by to see it.
Saturday, March 26, 2016
Tatting on Sock Dolls
Butter Bean is about to turn one so I've been busy creating something special for her birthday. Her mother was about the same age when I made her some sock dolls. I didn't tat then, so they didn't look as fancy as these two. I like the eye placement on the blue-eyed one better than the brown-eyed one now that I look at them together. I didn't compare the two as I worked, instead creating one and then the other. It has been an all-day project.


I needed an edging for the neck that would curve in a very tight circle. I was inspired by the current round I'm working for the Norma Benporath Mystery Cake Doyley. Rings have the same count and picot placement as that round, but the arrangement of the rings is different. I shall count these as Motif 7 for the 25 Motif Challenge.

The thread on the blue-eyed doll is Lizbeth Juicy Watermelon in size 20. The thread on the brown-eyed doll is an HDT by Jess Foster aka Tat-ilicious. I love all of the threads I received from Jess.

Thursday, March 24, 2016
Almost done!
With the crown, that is. It is really coming together nicely. Just one more section to go.


And I managed to get a few more inches done on round 1 of the Benporath Mystery Cake Doyley.

Wednesday, March 23, 2016
More Time Than Usual to Tat
A drive to Memphis with my daughter for a day at the Memphis Zoo yesterday meant that I had more tatting time than usual. I worked on the Norma Benporath Mystery Cake Doyley during the drive, then loaded beads and tatted another section on the modified Gale Marshall Queen Mom Memorial Crown when I got home. The zoo was wonderful in spite of the wind. It was a fantastic day.


Wednesday, March 2, 2016
Mystery Tat Along - Norma Benporath Round Doily
I've got to purchase some beads before I can start the project with the next deadline, so I'm reluctant to return to my big project for myself. I just can't get excited about starting it just to put it back down again for a more urgent project.
Looking for something to occupy me in the meantime, I stumbled across the second Benporath Mystery Tat Along in Craftree and decided to jump right in. The pattern is at http://www.craftree.com/patterns/5557
I finished the medallion that goes in the center of the fabric circle. Now to start the edging that is supposed to mount to the outside of a fabric circle. I'm working with Finca size 16 perle cotton. It has been ages since I've worked a project with it. It didn't take many double stitches to remind me why it's one of my favorite threads. (And, yes, that's a dab of Fray Check on the join. I was feeling lazy and tatting for myself. I confess I find it a wonderfully useful shortcut now and then.)

Looking for something to occupy me in the meantime, I stumbled across the second Benporath Mystery Tat Along in Craftree and decided to jump right in. The pattern is at http://www.craftree.com/patterns/5557
I finished the medallion that goes in the center of the fabric circle. Now to start the edging that is supposed to mount to the outside of a fabric circle. I'm working with Finca size 16 perle cotton. It has been ages since I've worked a project with it. It didn't take many double stitches to remind me why it's one of my favorite threads. (And, yes, that's a dab of Fray Check on the join. I was feeling lazy and tatting for myself. I confess I find it a wonderfully useful shortcut now and then.)

Saturday, October 3, 2015
Norma Benporath Mystery Edging
The tatting is done, but I haven't pressed it yet. The outer round has a ruffled effect at the moment which I think is quite attractive. It has been lots of fun to tat.


Sunday, September 27, 2015
Benporath Mystery Edging update
Hello, everyone. I've completed the tatting of round 2 so that the foundation round of squares now has a completed round on either side. Norma's instructions have you tatting this outer round with ball and shuttle, but it is obvious that some of the rings must swing out for joining to the next and final round. I chose to tat with ball and shuttle just leaving these rings free and then folding them up and out because I felt the resulting sharp v-shape of the chains might have been what Norma had in mind. If I had chosen to tat with 2 shuttles and make these outward facing rings with the 2nd shuttle, the chains would have had the more traditional curved shape. That just isn't what I hoped to achieve.


This would be a lovely place to stop. Several of my family members thought it was finished. It will be interesting to see what effect the final round will have upon the overall appearance. The last round should produce a scalloped look and I plan to work it in the variegated thread I used for the foundation round of squares.
Subscribe to:
Posts (Atom)