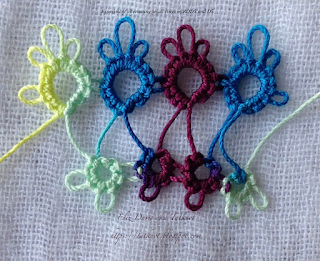
I've remembered a few more things about the lost tatting pattern (see previous post). The berries on the edging pattern I'm trying to find hang beneath the horizontal edging. The berries are tatted separately with rings only (tiny bare thread spaces between them) and the edging is ring and chain. You join the berries to the chain as you tat it. One of the Craftree members has searched her Workbasket collection and several of us have searched Pinterest for possibilities, but no one has found it yet. Remember, I tatted this in the 1990s, so it won't be a recent pattern. I think the pattern for the berries was a diagram of some sort. It would sure be easier if I could find the missing tatted edging sample. :(
I've updated all of the Element-al documents. You don't have to be a designer to use them. The links in the Techniques one should all be hot and you have your choice of pdf or Word version of it. I apologize to you needle tatters. I haven't made any updates to the techniques for you. I confess I don't use my needles very much, but all of you (needle and shuttle tatters) are invited to send me links to add to the documents. My own limited knowledge has guided the development of these documents so do alert me if you see anything that is incorrect. I value your feedback.
Sunday, October 30, 2016
Saturday, October 29, 2016
Pattern Search & Thirteenth Day of December
Tatting Pattern Search - Help Needed!
Hello, my friends. I'm hoping you can help me. In my early days of tatting in the 1990s, I had an edging pattern that featured separately tatted berries (raspberries?). I used it as the idea behind a bookmark I tatted for an exchange, placing one berry on the end of the green bookmarks tail as a sort of charm. I can't even remember who received the bookmark in the exchange. It was tatted with Finca size 16 perle cotton. Does anyone remember ever seeing such a pattern? I'm thinking it was in a magazine, possibly Workbasket, but I haven't found it yet in my stash of magazine patterns.The Thirteenth Day of December - Thank you, Rachael Mohler!

The Thirteenth Day of December
from 24 Snowflakes in Tatting by Lene Bjorn
Manuela size 20
Motif #4 in 3rd 25 Motif Challenge of 2016
I skipped over this snowflake as I was working on the Craftree challenge to tat all of the snowflakes from this book before the year is out. Every one of those chain rounds requires a split chain and I haven't been able to remember how to do it. It seems that remembering seldom used modern tatting techniques is not like riding a bicycle. When I learned it the first time, I was following email instructions (without illustrations) that I received from David Collyer. There are now several wonderful resources out there for learning this technique, but I learned from my own experience in trying to relearn it that you should not give up after using one or even many recommended resources. You just have to find the one that finally causes what you saw in all of the others to click into place. For me, it was the video instructions for tatting the single shuttle split ring in Rachael Mohler's Hen N Chick Square. Thank you, Rachael!
My tatting of this wonderful floral snowflake is not without mistakes. I was so focused on the split chains that I failed to follow the stitch counts properly for the outer round, but the chains are long enough that it still has a nice look to it.
TWoT notes: I tatted this snowflake using traditional tatting. When I reversed work after the central ring, I started tatting the design from the back so progression was in a counterclockwise direction. However, each split chain segment moves in the opposite direction so there is a small segment of chain in each of the inner chain rounds that moved clockwise again before I started the next chain round.
Woo Hoo! I can be a bit obsessive sometimes and I hated skipping a number. :) Now I can move forward again with confidence that the next split chain is not going to trip me up.
Happy Tatting!
Thursday, October 20, 2016
Laurel Leaf and Mirror Image
Spoiler alert: If you are working on muskaan's This Way or Tat series, and wish to complete the challenge of creating a mirror image of the Laurel Leaf on your own, read no farther!

Motifs #2 & #3 in 3rd 25 Motif Challenge of 2016
size 20 Cecelia, sage green
The tatting is still damp from spritzing and finger pressing, but I'm so excited I just had to post this right away.
Have you ever persisted in doing something just to see if it could be done? Some of you might have figured this out right away, but it would have spoiled my fun had I asked you how to do it. (Hence the spoiler alert above.)
The background: You see, it's obvious to me that there are a lot of tatters who prefer to use traditional double stitches. That's fine. It's my own preference most of the time, and there is no right or wrong method. I knew that I could use RODs to create a mirror image. (Muskaan shares more about this method in her blog.) My challenge to myself was to do it with traditional double stitches only.
I won't tell you some of the many things I tried before it suddenly occurred to me to tat it from the bottom up! I began with a true ring just as I did with the first one, but I was actually starting the tatting from the back. The tatting of the double stitches in the rings must be in reverse order, but that is really easy to see in the diagram--instead of that bottom ring being tatted 3+6-9, it had to be tatted 9-6-3 with the last picot being very small for joining the bare thread as I worked my way up. That same rule holds for all of the rings. I left the shuttle thread attached to the top ring of the mirror image so you can see where I ended. The final thing I needed to do was to bring up the starting tail and join it to the bare thread between the two base rings.
Notes:
1) By starting both leaves with true rings and reversing work as instructed in the pattern, when the leaves are posed as above, the outer rings of each leaf are 'face down' and the inner rings are 'face up,' making the top ring of each leaf face up.
2) TWoT direction in this project is very straightforward. Movement is down in the original leaf and up in the mirror image above.
Happy tatting, everyone.
Sunday, October 16, 2016
Candle from Mohler Square & TWoT Observations

Candle adaptation using Rachael Mohler's Hen n Chicks Square
Motif #1 in 3rd 25 Motif Challenge of 2016
Threads: Green size 20 Cebelia, Red size 20 Manuela,
Variegated Gold/White size 20 Manuela
with strand of Gold Kreinik Blending Filament
This was my first attempt at Rachael's square which uses her alternative method for a single shuttle split ring. You might remember that I've been struggling to relearn the split chain, but the knots just clicked for me in Rachael's square. Maybe I've ended my split chain problems. I certainly hope so.

I experimented by starting these squares at different places. Both of the efforts to the left in the image above began with the large ring in the corner. As expected after my previous ring only experiments as part of muskaan's This Way or That Set 1, the work after this ring progressed clockwise.
In the red square that I've attached to the green one, I decided to start with an inner ring. As you can see from my arrow in the above picture, the work progressed counterclockwise as in my previous experiments with beginning with inner rings. By choosing to begin at a ring that is a SSSR in Rachel's original design, I was also able to test how the split rings look compared to a true ring in the same location. See if you can find the ring in the candle picture above. I'm very pleased with the result.
I considered tatting additional squares to make a bookmark or a square mat. I even considered laying the squares on their sides and adding little bows to the top of each so that they looked like gifts. I finally settled on the candle ornament above, adding some blending filament to the variegated gold and white thread to create a flame on the top.
Conny Pheiffer's Angel

Test Tat of Cornelia Pheiffer's Angel
Motif #2 of 3rd 25 Motif Challenge
White size 30 Cebelia
I got one other item tatted this week. Cornelia Pheiffer gave me an opportunity to test tat this pattern for her. It is a well-done design, and she offers the pattern for your free use. Thank you, Conny!
Tuesday, October 11, 2016
Wiggly Flowers, Butterfly Liberated, and Wiosna 2016 update

Wiggly Flowers by muskaan
Motifs #22, #23, and #24 in 2nd 25 Motif Challenge of 2016
Pink variegated (size 10 Manuela), Other variegated (size 20 Lizbeth)
After my last few posts, you were probably wondering if I was ever going to finish tatting something. :) Well, I did! And they were all quick, easy, and fun.
Wiggly Flowers is a great variation of the daisy diagram on page 9 of the pdf (1.A.iii.) as it uses half-closed rings. I love using beads in the opening of half-closed rings, so, after tatting a bead-less one to get the size, I searched through my bead stash for something the right size and a suitable color for a flower center.

Butterfly Liberated by muskaan
Motif #25 of 2nd 25 Motif Challenge of 2016
Same size 20 Lizbeth variegated thread as Wiggly Flowers
This little flutterer is also a variation of diagram I.A.iii on page 9, but with "a twist" as muskaan puts it. I tatted this with all traditional double stitches, including the little half-closed ring that is tucked in between the outward facing rings. While I've made loads of those 4-ring butterflies where the ends become the antennae, I find myself thinking every time that the butterfly needs a body! That little 4-ring design is just 2 wings (4 wing segments) and antennae. I like to think the knot I tie is the head. :) Now my ring-only butterflies can have a body. Thank you, muskaan. (Tat it for yourself and notice the flow of the work. Did you find it to match that diagram, too?)

Progress update: Serwetka Wiosna 2016 by Renata Renulek Niemczyk
size 80 (DMC & Lizbeth)
I'm finally back at work on this project and enjoying it. I'm working round 10 with yellow on shuttle 1 to form the inner-joining rings and white on shuttle 2 for the chains and thrown rings. All of my tatting on this doily has been traditional double stitches, but I do have a definite front side in mind. I've deliberately tatted each round so that the yellow rings and multiple picot rings that I view as flowers (like those in that first purple and white round) are all facing the same side up. This is how you are seeing it in the image above and how I plan to display it. Since this round has more of my little yellow flowers, I wanted those yellow rings to be face up compared to all of the other yellow rings in the doily so far. When I reversed work after that first yellow ring, I found myself moving around the doily in a counter-clockwise direction as you can see. I've found some similarities to the ring-only diagrams that we covered in the online class last night, but I know muskaan is going to cover ring and chain combinations as well, so I'm going to save my thoughts until then. :)
Happy tatting, everyone!
Monday, October 10, 2016
TWoT? Set 1 - Experiments with Ring Only Wreath
Tatting time seems hard to come by at the moment, so instead of tatting the entire Wreath, I decided to play with a segment of it. You can use any stitch count you like to create your own wreath or use the numbers I've already worked out.

In muskaan's This Way or Tat? diagrams thus far, she has repeatedly paired DS (double stitches) and RODs (reverse order double stitches--you just tat the halves in the opposite order) as options producing the same directional results. As I've said before, I don't use RODS very often. In fact, I've used them more in the last month than I've used them in the rest of the more than 20 years I've been tatting. :)

Experiment #1: If RODs and DS both result in tatting that progresses in the same direction, I should be able to alternate between them with no change in the direction the work is progressing. I tried it in the small rings pictured above. I started the tatting with the large ring in the upper left corner. The first and third small rings are made with RODs. The second and fourth are made with DS. It really didn't make any difference to the direction in which the work progressed.

Experiment #2: A challenge from muskaan to start with a different ring. While I continued to alternate ROD rings and DS rings, it really won't matter. Tat with whichever method you prefer. I normally start with an inner ring and tat both small and large rings with DS. I've noted my starting ring in each of the two tatting segments above. I've also placed each piece with the starting ring face up (note you can see the top of the double stitches on either side of the picots). The starting point did impact the direction in which the work progressed.
I know some of you are thinking, "What does it matter?" If at this point in your tatting, you aren't running into any problems following the diagrams you use and you don't care, there is nothing wrong with that. Over the many years that I've been tatting, I've tatted lots of pieces with the knowledge and understanding I had at the time. It was fun and it was rewarding. Over those years, though, I began to notice things (some of them very small) that slowly began to impact how I chose to work a design and how I chose to display the finished piece. Muskaan's explorations are very timely for me because I had begun to notice that the direction I follow a diagram DOES matter for some designs and I was starting to wonder why this is so. With her help, I'm developing my awareness of these differences in direction with the kind of designs that have never troubled me, knowing that it will come in very handy when I run into the next one where it does. So, enjoy where you are in your tatting experience and choose to stretch yourself a bit more if and when you are ready.
Now, I believe I promised muskaan that I would share my mental trick that makes RODs easy for me. It relies on two factors:
1. Once you've been tatting for a while, you don't really have to think about how to form double stitches. Your tatting flows easily from one double stitch straight into the next. You are already used to a 1st half following a 2nd half.
2. I don't usually count 1/2, 1, 1 1/2, 2... I count 1, 2, 3... Every 2nd movement of my shuttle gets the number. RODs (reverse order double stitches) are just double stitches that start with the 2nd half, rather than the 1st. The only thing I have to remember is which movement starts the tatting of the ring or chain segment I'm about to begin. That same movement starts the tatting after every picot in that element. If I'm working RODs, that movement will be the over and down movement that usually forms the 2nd half. If I'm tatting DS, that movement will be the under and up movement that usually forms a 1st half. Remember, the second movement gets my count.
Once I get started, it takes only a microsecond to orient myself at the start of each element or after a picot. I hope some of you find this is helpful.
Thursday, October 6, 2016
Tatting Right-Handed vs Left-Handed (more This Way or Tat?)
When I first started teaching others to tat more than 20 years ago, I was sensitive to the difficulties of left-handed individuals to learn new skills from the right-handed. You see I have two left-handed siblings and one of them wanted to learn to tat. Even though I'm right-handed, I actually prefer to use my left hand for some tasks, so I decided to try tatting left-handed.

I learned some very valuable things from the experience. Firstly, rings and chains progress from right to left (counterclockwise). You can't switch at will from left-hand to right-hand, or vice versa. Believe me, I tried that, too. Once you start a round, you are committed to continuing with the hand you begin with.
Over the years I've taught ring first, chain first, and now I teach finger-tatting a ring first. I always encourage my tatting students to try out different hand positions if they find it awkward to tat with the position I demonstrate. I don't use the same hand position with both hands as you can see from these images.

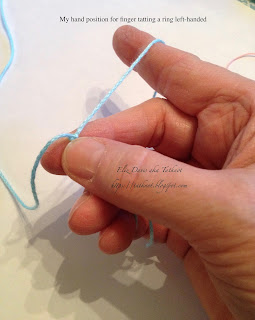
If you've been following along with muskaan's "This Way or Tat?" series, you'll have noticed that she points out that her observations are based on tatting right-handed. My own limited experience with tatting left-handed leads me to theorize that progression would consistently be in the opposite direction to that of the right-handed tatter.


By left-handed tatting, I refer to holding the shuttle or needle in your left hand.
I learned some very valuable things from the experience. Firstly, rings and chains progress from right to left (counterclockwise). You can't switch at will from left-hand to right-hand, or vice versa. Believe me, I tried that, too. Once you start a round, you are committed to continuing with the hand you begin with.
Over the years I've taught ring first, chain first, and now I teach finger-tatting a ring first. I always encourage my tatting students to try out different hand positions if they find it awkward to tat with the position I demonstrate. I don't use the same hand position with both hands as you can see from these images.
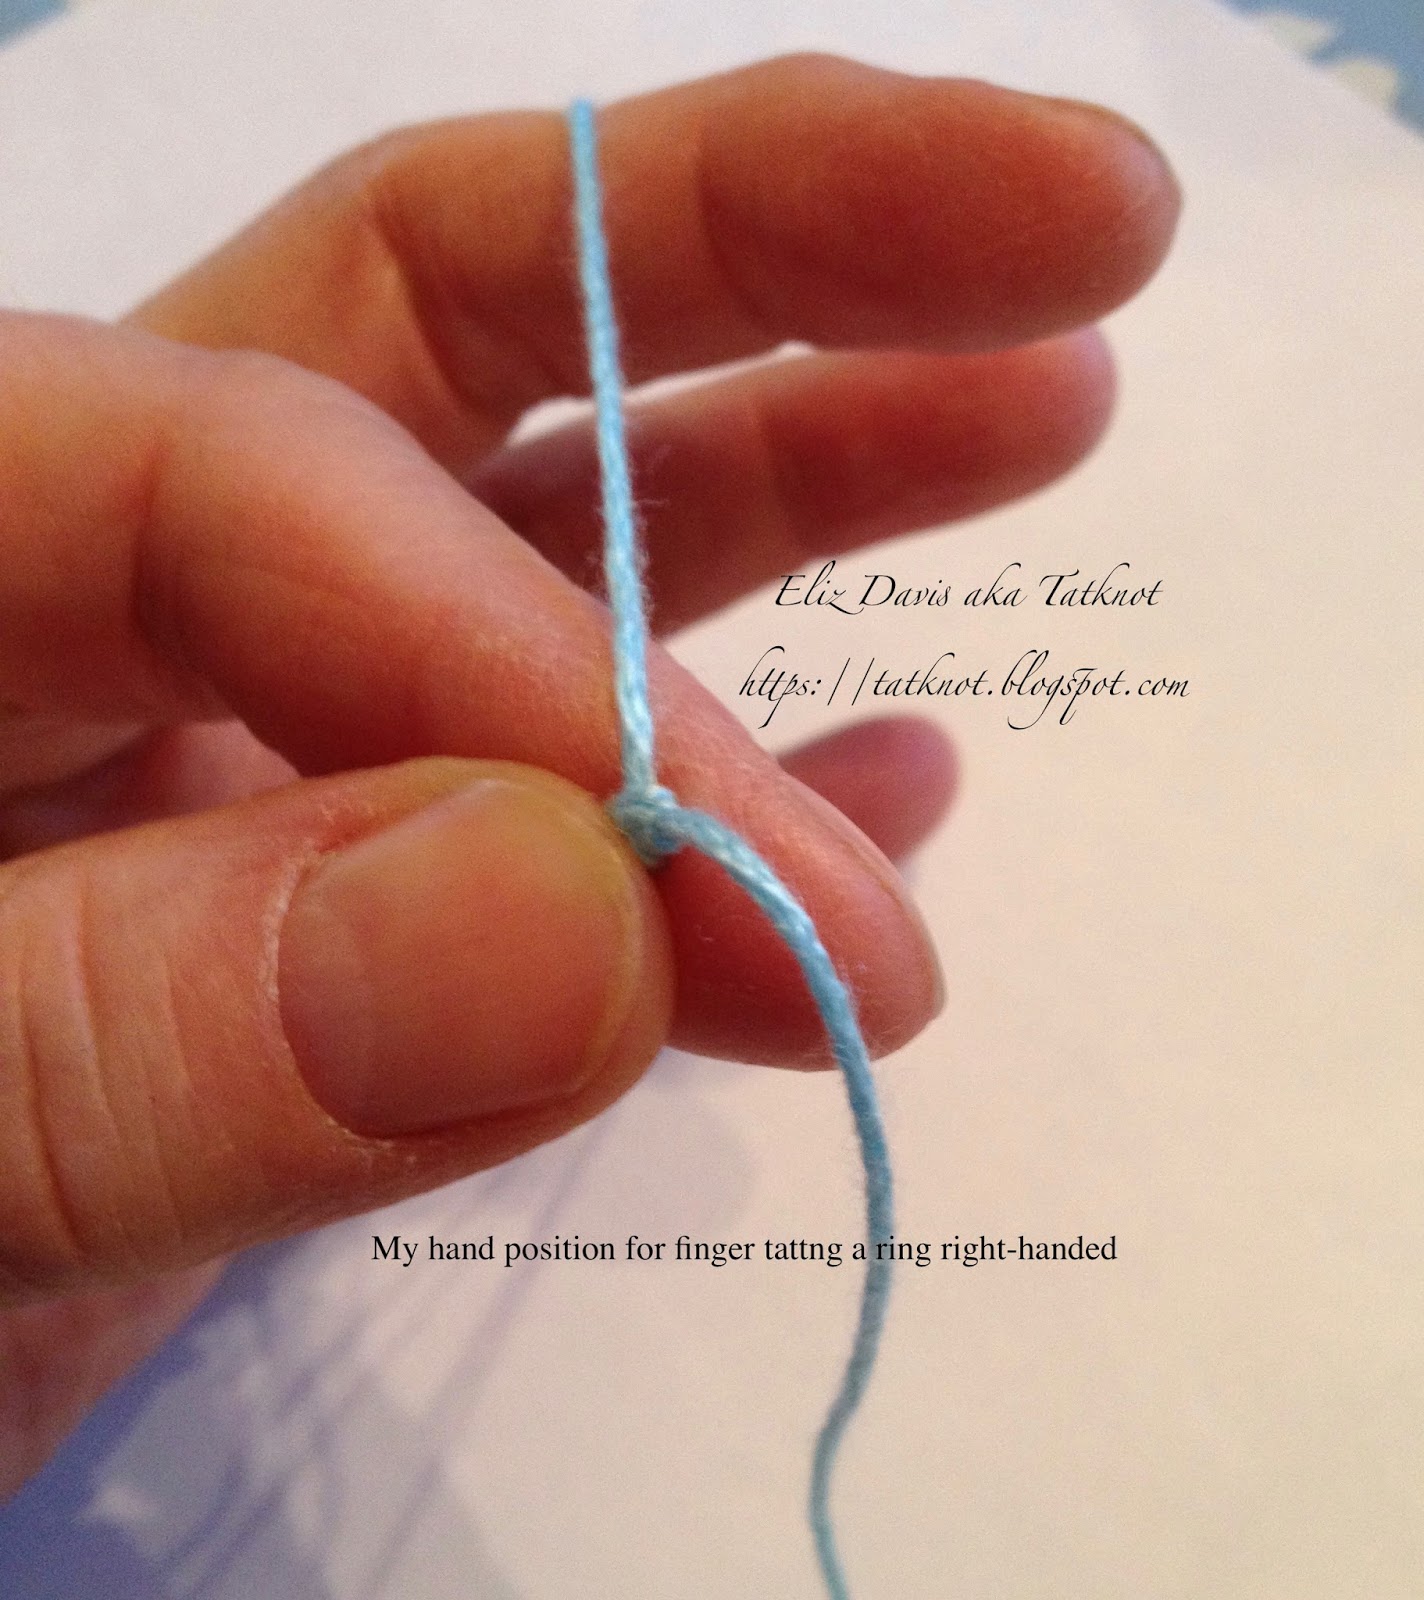
Right-handed: I grip the double stitches between thumb and index finger and tension by flexing the remaining three fingers of that hand.

Left-handed: I grip the double stitches between thumb and middle finger and tension by flexing my index finger.
If you've been following along with muskaan's "This Way or Tat?" series, you'll have noticed that she points out that her observations are based on tatting right-handed. My own limited experience with tatting left-handed leads me to theorize that progression would consistently be in the opposite direction to that of the right-handed tatter.

The larger ring was ring #1 and you are looking at it face up. I tatted the second ring with traditional double stitches after a reverse work. As you can see, the wreath will progress in a counterclockwise direction.
I'll be tatting with my right hand again for my next post. Are there any left-handed tatters out there who want to test my theory further by tatting through the exercises with us? Or perhaps your own experience has shown you this?
By the way, muskaan, I'll include my method of keeping DS and RODs straight in my head with that next post. It will fit in better there. :)
Happy tatting, everyone!
Sunday, October 2, 2016
Emptying Shuttles and TWorT Observations

Butterfly Twins
see link in My Patterns
Motif #21 in 2nd 25 Motif Challenge of 2016
With tatting direction much on my mind lately (see muskaan's This Way or Tat), I couldn't help noticing that the tatting progresses in a clockwise direction with the 3 inner rings and then changes to counterclockwise to complete the outside round. As you can see from the colors in the small split ring on the right of the left butterfly, the second shuttle that formed the unflipped stitches of that split ring, became my 'ball' thread as I reversed work to begin the outer round. This is very clear in the diagram (image) pattern, too. It was a great beginning to my afternoon of tatting because it really helped me get oriented in regards to actual tatting and a diagram.

Variation of Small Cross Bookmark
see link in My Patterns for original
Motif #22 in 2nd 25 Motif Challenge
So, now I felt ready for a challenge, and with a pattern that I didn't design.

Tatted Cupcake 2 by Nancy Tracy
shared at http://be-stitched.com
Motif #23 and #24 in 2nd 25 Motif Challenge
If you remember, I mentioned orientation earlier in this post. I tend to try to follow patterns in a clockwise direction regardless of whether or not I'm actually tatting in that direction (largely because I really haven't paid any attention to the direction in which I was tatting). I now realize that this is why I sometimes struggle with a diagram or find myself referring to the written instructions as I work through the diagram. It became really obvious to me as I worked these cupcakes. Once I started following the diagram in the direction in which I was actually tatting, following the diagram became so much simpler!
So, first some basics about the differences in the two cupcakes: The one on the left is worked with double stitches and reverse order double stitches to produce an obvious front and back side. (I'll have to remember share my little mental trick that makes this as easy for me to do as traditional tatting, even though I rarely do it.) The one on the right is tatted with traditional double stitches only. I reversed work and used the shoelace trick where indicated in both cupcake bases. Since I already had two shuttles loaded with matching thread, I didn't bother with the shoelace trick in the top on the left since I could easily change the working shuttle.
I decided to consider the first ring tatted to be the front of the pattern--probably the most common assumption. I've displayed them both for you with that ring facing you in the image. The basic shape of a ring surrounded by a chain is the start of both the base and the top. Since I used a solid color for both bases it is hard to see the order of progression. The wonderful thing about the variegated threads is that they make the direction very obvious. Take a look at the center rings in the tops of each. Remember those center rings are facing you just as they would if you were tatting them but they are upside down. Notice the way the thread color progresses out of those rings to move to your left? When I reversed work, I actually started moving around the diagram to the left. This was unaffected by whether I was tatting with DS and RODS or with DS alone. You can see the thread color progressing out of the top of the rings and into the chains on the left in both cupcake tops.
By habit, I kept referring to the right side of Nancy's diagram as if I were moving clockwise, which kept sending me back to her written directions to clarify what I was doing next. When I realized the discrepancy between my tatting direction and direction in which I was following the diagram, I started following the diagram in a counterclockwise direction. Wow! The tatting went much faster and smoother after that with no more need to refer to the written instructions.
I realize that I didn't get oriented properly to muskaan's diagram when I posted about my observations with her first exercise and I'll be posting a revision of that along with an explanation of what I think threw me off. I hope I didn't cause any confusion for any of you who are following this or experimenting on your own. Even though I've seem some of what muskaan will be sharing with us in the weeks ahead, and even worked with many of the diagrams, I really feel it's only now sinking in as I apply the awareness to actual pieces I'm tatting and their diagrams.
Happy tatting!
Subscribe to:
Posts (Atom)